User Guide

Welcome to the AgentAssist User Guide!
The AgentAssist User Guide is here to help you unlock the full potential of AgentAssist and take your credit card sales to the next level. This guide offers clear, step-by-step instructions and practical examples to help you get the most out of the application.
In this guide, you’ll learn how to:
- Set Up AgentAssist to be used to manage clients.
- Navigate and Use Key Features like contact management, filtering, and more.
- Optimize Your Workflow with shortcuts, data export/import, and automatic saving.
Let’s begin and get you up to speed with AgentAssist!
Table of Contents
- Introduction
- Important Prerequisites
- Getting Started
- Glossary
- Understanding Commands in AgentAssist
- 5.1 Command Structure Overview
- 5.2 Commands
- 5.3 Flags
- 5.4 Arguments
- 5.5 Using Commands
- Commands
- FAQ
- Known Issues
- Command Summary
1. Introduction
1.1 What is AgentAssist?
AgentAssist is the definitive desktop tool for credit card sales agents. Merging the swift efficiency of a Command Line Interface (CLI) with the intuitive accessibility of a Graphical User Interface (GUI), this application lets you manage contact databases, track sales progress, and execute transactions with unprecedented speed.
Overview of Key Features:
- Contact Management:
- Manage your client details easily. Add, edit, and delete contacts to keep all your client information in one accessible place.
- Keyboard-centric Navigation:
- Navigate through the application entirely via keyboard shortcuts, improving workflow efficiency.
- Multi-Level Filtering:
- Filter your data by multiple criteria to find exactly who you’re looking for.
- Auto-Save:
- Automatically saves your work as you go, ensuring data is updated without manual intervention.
- Effortless Data Import & Export:
- Import or export client and sales data in compatible formats for backups or use in other systems.
Maximize your productivity, minimize your response time, and amplify your sales performance. With AgentAssist, you’re not just keeping up with the competitive world of credit card sales — you’re setting the pace.
2. Important Prerequisites
Before you start using AgentAssist, there are a few prerequisites to ensure you get the most out of the application:
Familiarity with Keyboard Navigation
AgentAssist is designed to enhance speed and efficiency, with a strong focus on keyboard-based navigation. While the application includes a Graphical User Interface (GUI), its full potential is unlocked when you use keyboard commands. Therefore, it is important to:
- Familiarize yourself with basic
Command Line Interface (CLI)commands if you haven’t already. This will make it easier to use AgentAssist’s command system effectively. - Know common keyboard shortcuts (e.g.,
Enter,Arrow keys, etc.).
Basic Understanding of Data Fields
AgentAssist allows you to manage client data like names, phone numbers, emails, and job information. A basic understanding of these data fields will make it easier to add, edit, and filter client information.
🎉 By meeting these prerequisites, you’ll be ready to make the most of AgentAssist’s fast, keyboard-driven interface and powerful data management features. 🎉
3. Getting Started
Welcome to AgentAssist. Here’s how to get up and running quickly and easily.
3.1 Installation
Quick Check: Do I Already Have Java 17?
Before installing Java, you can check if it’s already on your computer:
- Open a terminal (or command prompt):
- Windows: Press Windows Key + R, type cmd, and press Enter.
- macOS: Press Command + Space, type Terminal, and press Enter.
- Linux: Open your Terminal application.
- Type the following command and press Enter:
java -version - Review the output:
- If the output shows “Java 17,” you’re ready to go and can skip to Step 2.
- If Java 17 is not installed, continue with Step 1 below.
Step 1: Install Java
Ensure you have Java 17 installed on your computer. AgentAssist is optimized for Java 17, and using other versions may affect performance or functionality. If you already have Java 17 installed, you can skip this step.
To install Java 17:
- Visit the Java download page from Oracle.
- Download the appropriate installer for your operating system (Windows, macOS, or Linux).
- Follow the installation instructions on the website to complete the setup.
- Once installed, verify the installation as per the section above.
ℹ️ What is Java?
Java is the platform that this AgentAssist runs on, providing the environment needed for smooth operation across different types of computers. Java is also used by many popular desktop applications, such as Minecraft and Apache OpenOffice. By using Java, we ensure that our app performs reliably on all supported systems, including Windows, macOS, and Linux.
Step 2: Download the AgentAssist application
Download the latest version of the .jar file from the AgentAssist repository.

Step 3: Choose a Folder
Find or create a folder on your computer where you want to store the AgentAssist application and its data. Move the .jar file you downloaded into this folder.
Step 4: Run the Application
- Open a command terminal
- Windows: press
Windows Key + R, typecmd, and pressEnter. - macOS: press
Command + Space, typeTerminal, and pressEnter. - Linux: open your Terminal application from the system menu.
- Windows: press
- Navigate your terminal to the folder where you saved the AgentAssist application:
- In the terminal, type:
cd <folder path>and press Enter. (Replacewith the actual location of AgentAssist.) - For example, if AgentAssist is stored in your Downloads folder:
- Windows:
cd C:\Users\<YourUsername>\Downloads - macOS/Linux:
cd /Users/<YourUsername>/Downloads
- Windows:
- In the terminal, type:
- Run the application:
- In the terminal, type:
java -jar agentassist.jarand press Enter. - After a few seconds, a window similar to the below image should appear. This is the AgentAssist interface, with sample contact information already loaded for you to explore.

- In the terminal, type:
- 🎉 Congratulations! AgentAssist is now up and running! You’re all set to start using AgentAssist to manage your client contacts, track your sales, and boost your productivity.
3.2 Graphical User Interface (GUI) Layout

The AgentAssist GUI is designed with intuitive sections and color-coded elements to optimize usability for credit card sales agents. Here’s an overview of the layout:
Main Components of the AgentAssist GUI:
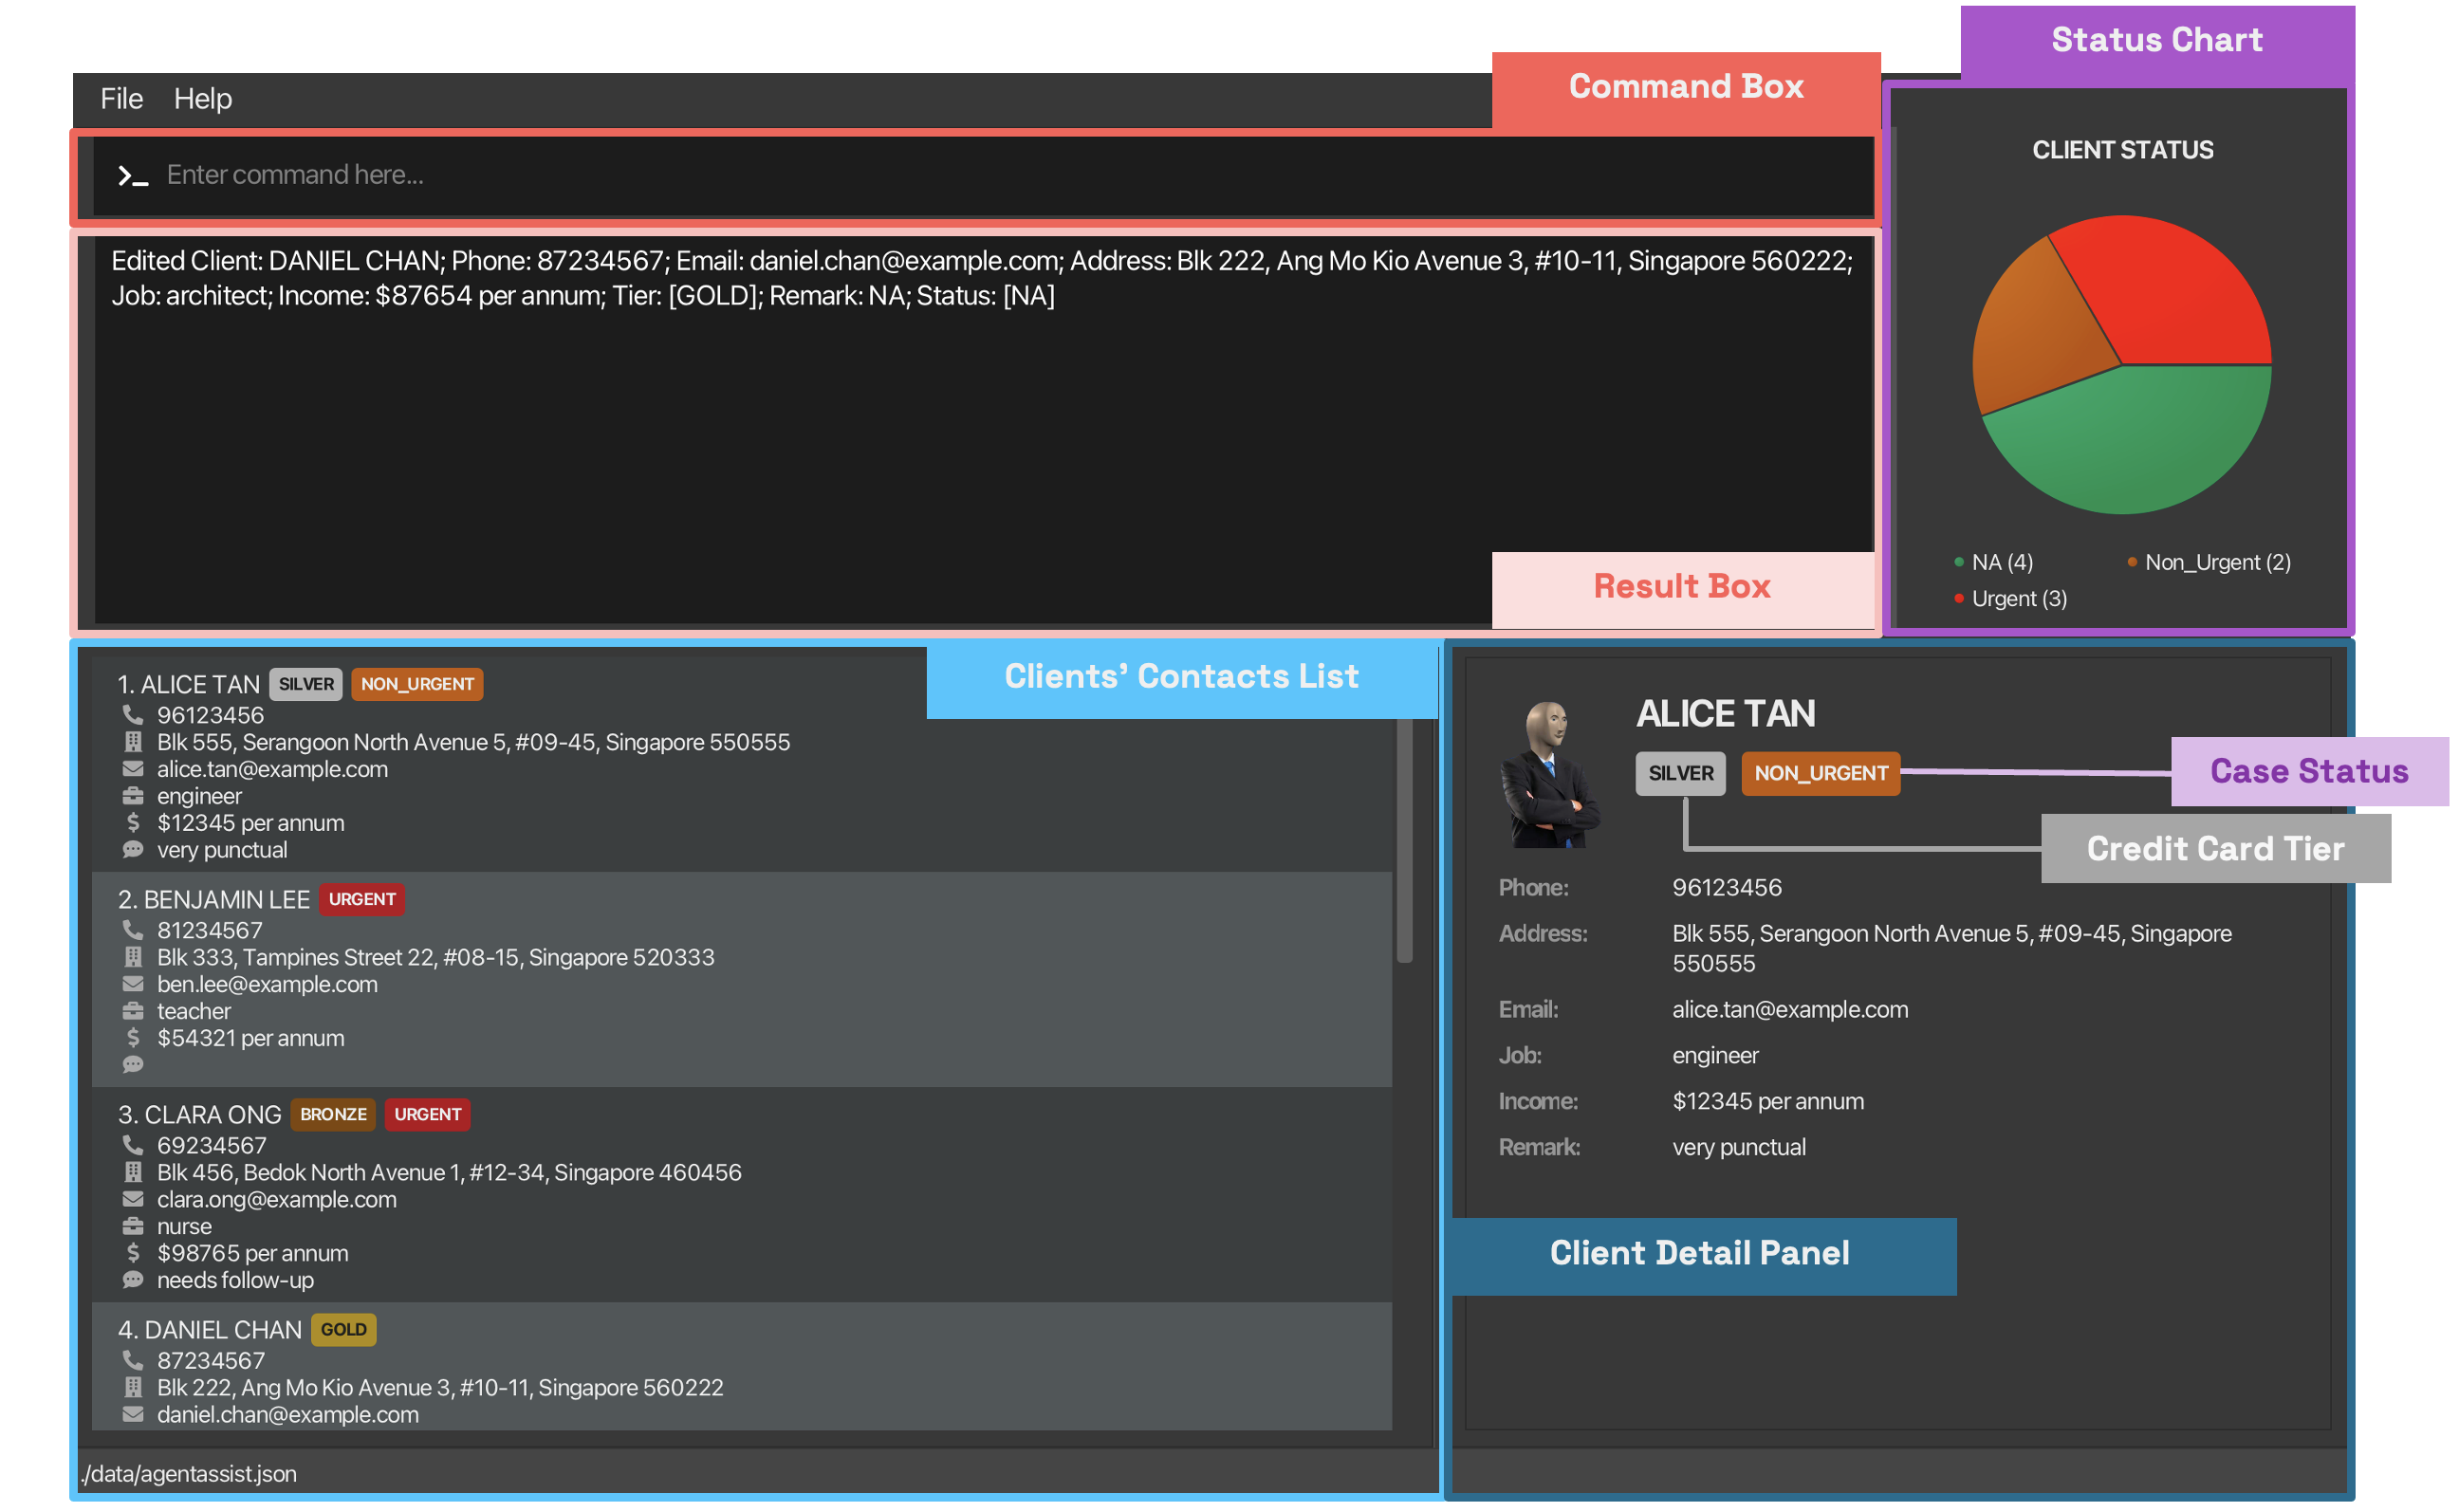
⬤ Command Box
The command box provides a CLI-style input field where you can type commands to execute various actions, such as searching for a client or updating details. This integration of CLI and GUI functionalities provides the efficiency of command-line input within a clear, visual interface.
⬤ Result Box
Displays responses to commands, such as client details, action confirmations, or error messages with helpful hints. This immediate feedback helps you to quickly verify outcomes, ensuring accuracy and efficiency with each action.
⬤ Clients’ Contacts List
A scrollable list that concisely displays client contact information, with icons identifying each field. Colored labels highlight each client’s credit card tier and case status to empower you to track the urgency of each case. This allows you to view all key information at a glance and easily identify high-priority clients.
⬤ Client Detail Panel
When a client is selected from the contacts list via the view command, this panel presents a detailed, scrollable view of their information in a split view format. This layout allows you to see full details, especially when some information might be truncated in the contacts list. Important details, such as contact information, job, and income, are prominently displayed to help you make informed, prioritized decisions.
⬤ Status Chart
A pie chart provides a visual summary of client case statuses (e.g., Urgent, Non-Urgent, NA), giving you a clear overview of your workload distribution and case priorities.
Tier Color Code for AgentAssist GUI:
Each client’s tier is represented with a color-coded label located beside their name in the client list or under their name in the Client Detail Panel. This visual aid helps you quickly assess the importance of each client and serve them with tailored credit card promotions.
⬤ Gold Tier
⬤ Silver Tier
⬤ Bronze Tier
⬤ Reject Tier
Clients that are not assigned to any tier (NA tier) will not display a tier label on the UI.
Status Color Code of AgentAssist GUI:
Case statuses are also color-coded and appear next to a client’s name in the list or below their name in the Client Detail Panel. This visual aid indicates the urgency level of each client’s case, helping you prioritize tasks.
⬤ Urgent Status
⬤ Non-Urgent Status
Clients with NA status (no follow-up required) have no status label on the UI but are represented in green (⬤) on the status pie chart to indicate that their cases are resolved or need no attention.
4. Glossary
This section contains a list of terms used in this user guide. Feel free to refer back to this section if you are unsure of what a term means!
-
Command Line Interface (CLI): A text-based interface where users interact with the application by typing commands rather than using a graphical interface.
-
User Interface (UI) / Graphical User Interface (GUI): A visual interface that allows users to interact with the application through graphical icons, like buttons and menus.
-
Credit Card Sales Agents: Users of the system who are responsible for selling credit cards to clients.
-
Contact: A record in AgentAssist that contains client details.
-
Commands: Text entered into the command box to instruct the application to perform an action, usually starting with a command word.
-
Flag(s): Modifier(s) in a command that specify the type of data being handled, typically represented by 1-2 letters followed by a backslash (e.g., n/ for “name”).
-
Argument(s): Value(s) provided in a command, typically following a flag.
-
Index: The number displayed next to a client’s name in the current list of clients, which changes when the list view is updated.
-
Remark(s): Additional note(s) or comment(s) about a client.
-
Tier: The credit card category that a client belongs to, based on their credit card type.
-
Status: An indicator of whether a client requires follow-up action from the user.
-
Auto-Save: A feature that automatically saves all changes made by the user, without needing manual input.
-
JSON (JavaScript Object Notation): A file format used in AgentAssist to store data, including client information.
-
Backup: A copy of saved data that can be restored for safekeeping.
5. Understanding Commands in AgentAssist
The true power of AgentAssist lies in efficiently using commands. Before diving into specific commands, let’s break down the basic structure of a command.
5.1 Command Structure Overview
Each command in AgentAssist consists of three key components: the command, flag(s), and argument(s).
Let’s take a look at the structure in more detail:
| Components | Description | Example |
|---|---|---|
| Command | The action you want AgentAssist to perform. | add |
| Flag(s) | Modifiers that specify what kind of data is being handled. Flag(s) are typically 1-2 letters followed by a backslash. |
n/, e/, r/, rn/ |
| Argument(s) | The values or inputs the command uses, such as client data or specific details. This guide may represent it as a placeholder using <ARGUMENT>. |
John Doe, john@example.com |
Here’s a snippet of a command that uses multiple flags and arguments:
add n/ John Doe e/ john@example.com
- Command:
addinstructs AgentAssist to add a new entry. - Flags:
n/ande/specify the information type (name and email). - Arguments:
John Doeandjohn@example.comare the actual values being input for the respective flags. - Note: This command is provided as an example for learning purposes only. Additional mandatory flags are needed to make it fully functional, which will be explained in the sections that follow.
5.2 Commands
A command is the action that AgentAssist will perform, such as adding, deleting, or editing a client’s contact.
Here is a reference table that briefly summarizes available commands:
| Command | Description |
|---|---|
add |
Adds a new client to the system. |
edit |
Modifies details of an existing client. |
delete |
Removes a client from the system. |
list |
Displays all clients currently stored in the system. |
filter |
Filters clients based on specified criteria. |
view |
Opens a split view showing detailed client information. |
close |
Closes the split view of client details. |
clear |
Deletes all clients from the system. |
undo |
Undoes latest command. |
help |
Displays a list of available commands and their usage. |
exit |
Exits the AgentAssist application. |
Refer to the Commands Section for more comprehensive details of each command.
5.3 Flags
AgentAssist uses flags as a shorthand for different options in commands. Flags help you specify what kind of information you are providing, allowing you to write shorter and more efficient commands, improving your workflow.
Here’s a reference table of available flags and the type of data they correspond to:
| Flag | Type of Data |
|---|---|
n/ |
name |
p/ |
phone |
e/ |
email |
a/ |
address |
j/ |
job |
i/ |
income |
t/ |
tier |
s/ |
status |
r/ |
remark |
ra/ |
remark append |
rn/ |
remark new |
💡 Pro Tip:
Flags are typically derived from the first letter of their corresponding data type (e.g.,
n/forname), making them easy to remember!
5.4 Arguments
Arguments are the values that are used in a command.
- Arguments typically follow after a corresponding flag, with the exception of
<INDEX>. - Arguments cannot be empty and each must meet specific parsing and format requirements to ensure proper execution of the command.
- When an argument is entered, any spaces before or after the argument are ignored. For example,
add n/ John Doeandadd n/John Doeare equivalent. Both pass the argument value ofJohn Doe. - In this guide we often add a space before any arguments to improve readability, however this is purely cosmetic (i.e., it is still correct without a space).
5.4.1 Flag Arguments
Flag arguments are the values that follow each flag in a command.
Refer to the table below for more details.
| Flag | Expected Argument | Description | Requirements |
|---|---|---|---|
n/ |
<NAME> |
The client’s full name | Any combination of letters, numbers, spaces, hyphens, apostrophes (no symbols). |
p/ |
<PHONE> |
The client’s personal phone number | Valid Singapore personal phone number: • 8-digit number • Starts with 6, 8 or 9 |
e/ |
<EMAIL> |
The client’s email address | Valid email format (username@domain.com) |
a/ |
<ADDRESS> |
The client’s physical address | Any combination of letters, numbers, spaces, and symbols. |
j/ |
<JOBNAME> |
The client’s job title or profession | Any combination of letters, numbers, spaces, and symbols. |
i/ |
<INCOME> |
The client’s annual income | Positive number or zero • Must be numeric • Cannot include commas and decimal points • Cannot be fractional |
t/ |
<TIER> |
The client’s assigned tier level | Must be one of the predefined tiers: • Gold, Silver, Bronze, Reject or NA |
s/ |
<STATUS> |
The client’s assigned status, indicating whether any followup action by the agent is needed. | Must be one of the predefined statuses: • Urgent, Non_Urgent or NA |
r/ |
<REMARK> |
General remark(s) about the client | Any combination of letters, numbers, spaces, and symbols. |
ra/ |
<REMARK TO APPEND> |
Append information to the existing remark(s) | Any combination of letters, numbers, spaces, and symbols. |
rn/ |
<NEW REMARK> |
Replaces the existing remark with a new remark | Any combination of letters, numbers, spaces, and symbols. |
Note: All of the above arguments are case-insensitive.
💡 Pro Tip:
Ensure every flag is followed by a valid argument!
Providing a flag without an accompanying argument will result in an error and prevent the command from executing properly.
5.4.2 Non-Flag Arguments
Non-flag arguments are the values that do not have a corresponding tag. Currently, this only includes the <INDEX> argument.
Refer to the table below for more details.
| Expected Argument | Description | Requirements |
|---|---|---|
<INDEX> |
The index of the item to be edited. | Positive number. • Must be less than or equal to the total number of clients in the current list view. |
💡 Pro Tip:
Indexes will change when the current list view changes!
Ensure that the index supplied is accurate to the current view.
Note: There is a known issue when the supplied index argument is too large. For more information, see Known Issues in Section 8.
5.5 Using Commands
To get started, simply type a command into the command box and hit Enter.
Some initial commands to try: Listing All Clients
list: This command displays all clients currently in your database, making it easy to browse through entries.
Adding a New Client
add n/ Jane Doe p/ 87654321 e/ jane@example.com a/ 123 Jane Road j/ doctor i/ 120000: Adds Jane Doe to your database with detailed contact information, job title, and income.
Editing a Client’s Information
edit 1 p/ 92345678: Updates the phone number of the first client in your list to92345678.edit 4 rn/ Updated remark(s) here: Replaces the remark(s) of the fourth client with “Updated remark(s) here”.
Removing a Client
delete 3: Removes the third client from your list. Ensure you have the correct index to avoid deleting the wrong client.
Searching for a Client
filter n/ Jane: Finds all clients named Jane in your database. It’s a powerful tool for quickly locating clients or filtering for a specific type of client.
Viewing Detailed Client Information
view 1: Opens a split view showing detailed information for the first client in your list.close: Closes the split view and returns to the full list display.
Getting Help
help: Opens a help dialog that provides a summary of all available commands and their usage.
The GUI will dynamically update to show the results of your commands, making it easy to see the impact of your actions in real time.
Note: The order of flags is flexible. For instance, edit 1 n/ john p/ 92223333 is equivalent to edit 1 p/ 92223333 n/ john.
Refer to the Commands Section for more comprehensive details of each command.
💡 Pro Tip:
The order of flags within commands is flexible. For instance,
edit 1 n/ john p/ 92223333is equivalent toedit 1 p/ 92223333 n/ john. Use whatever order feels most natural!Combine commands like
filterfollowed byeditordeleteto manage your contacts more effectively.
- For example, use
filter j/ doctorto display all doctors, thenedit 2 a/ 321 New Addressto update the address for the second listed doctor.
6. Commands
6.1 How to Read Commands
When working with commands in AgentAssist, it’s important to understand how the command format is structured. Commands consist of specific components like flags and arguments, and some parts of the command can be optional.
If you’re unfamiliar with how commands are structured, refer back to the Command Structure Overview in Section 5.1 for more details on how flags, arguments, and placeholders work together.
Command Syntax
When reading commands, there are certain syntax conventions that help indicate how to use them:
-
< >(Angle Brackets): Text enclosed in angle brackets represents a placeholder for the actual value you need to provide. For example,<NAME>should be replaced by the client’s actual name, such as “John Doe”. -
[ ](Square Brackets): Components enclosed in square brackets are optional. You can choose to include them if necessary, but they are not required for the command to execute. For instance,[t/ <TIER>]means that the credit card tier is optional, and if omitted, a default value will be used.
Example Command:
add n/ <NAME> p/ <PHONE> e/ <EMAIL> a/ <ADDRESS> j/ <JOBNAME> i/ <INCOME> [t/ <TIER>] [r/ <REMARK>] [s/ <STATUS>]
- Mandatory Components: Flags such as
n/,p/,e/,a/,j/, andi/must be followed by valid arguments like the name, phone number, and job title. - Optional Components: Flags like
t/,r/ands/are enclosed in square brackets, indicating they are optional.
6.2 Data Modification Commands
6.2.1 Adding a new client
Purpose: Save detailed records of a new client.
Each client’s record includes their name, contact number, email, occupation, and income. You can also enter the optional fields for credit card tier, status and remark(s) here. Otherwise, new users are assigned a default value of “NA”.
Command Format:
add n/ <NAME> p/ <PHONE> e/ <EMAIL> a/ <ADDRESS> j/ <JOBNAME> i/ <INCOME> [t/ <TIER>] [r/ <REMARK>] [s/ <STATUS>]
- Mandatory Fields:
n/,p/,e/,a/,j/,i/ - Optional Fields:
t/,r/,s/
Refer to Sections 5.3 Flags and 5.4 Arguments, for detailed explanations of each flag and acceptable arguments.
Examples:
- Add new client (without optional fields):
add n/ JOHN DOE p/ 99007766 e/ mrdoe@ntu.sg a/ com3 j/ doctor i/ 99999 - Add new client with tier, remark(s) and status:
add n/ JOHN DOE p/ 99007766 e/ mrdoe@ntu.sg a/ com3 j/ doctor i/ 99999 t/ gold r/ got anger issue s/ urgent
What to Expect:
- On Success:
- Message:
New client added: Name: <NAME>, Phone: <PHONE>, Email: <EMAIL>, Address: <ADDRESS>, Job: <JOB>, Income: <INCOME>, Tier: <TIER>, Remark: <REMARK>, Status: <STATUS> - If
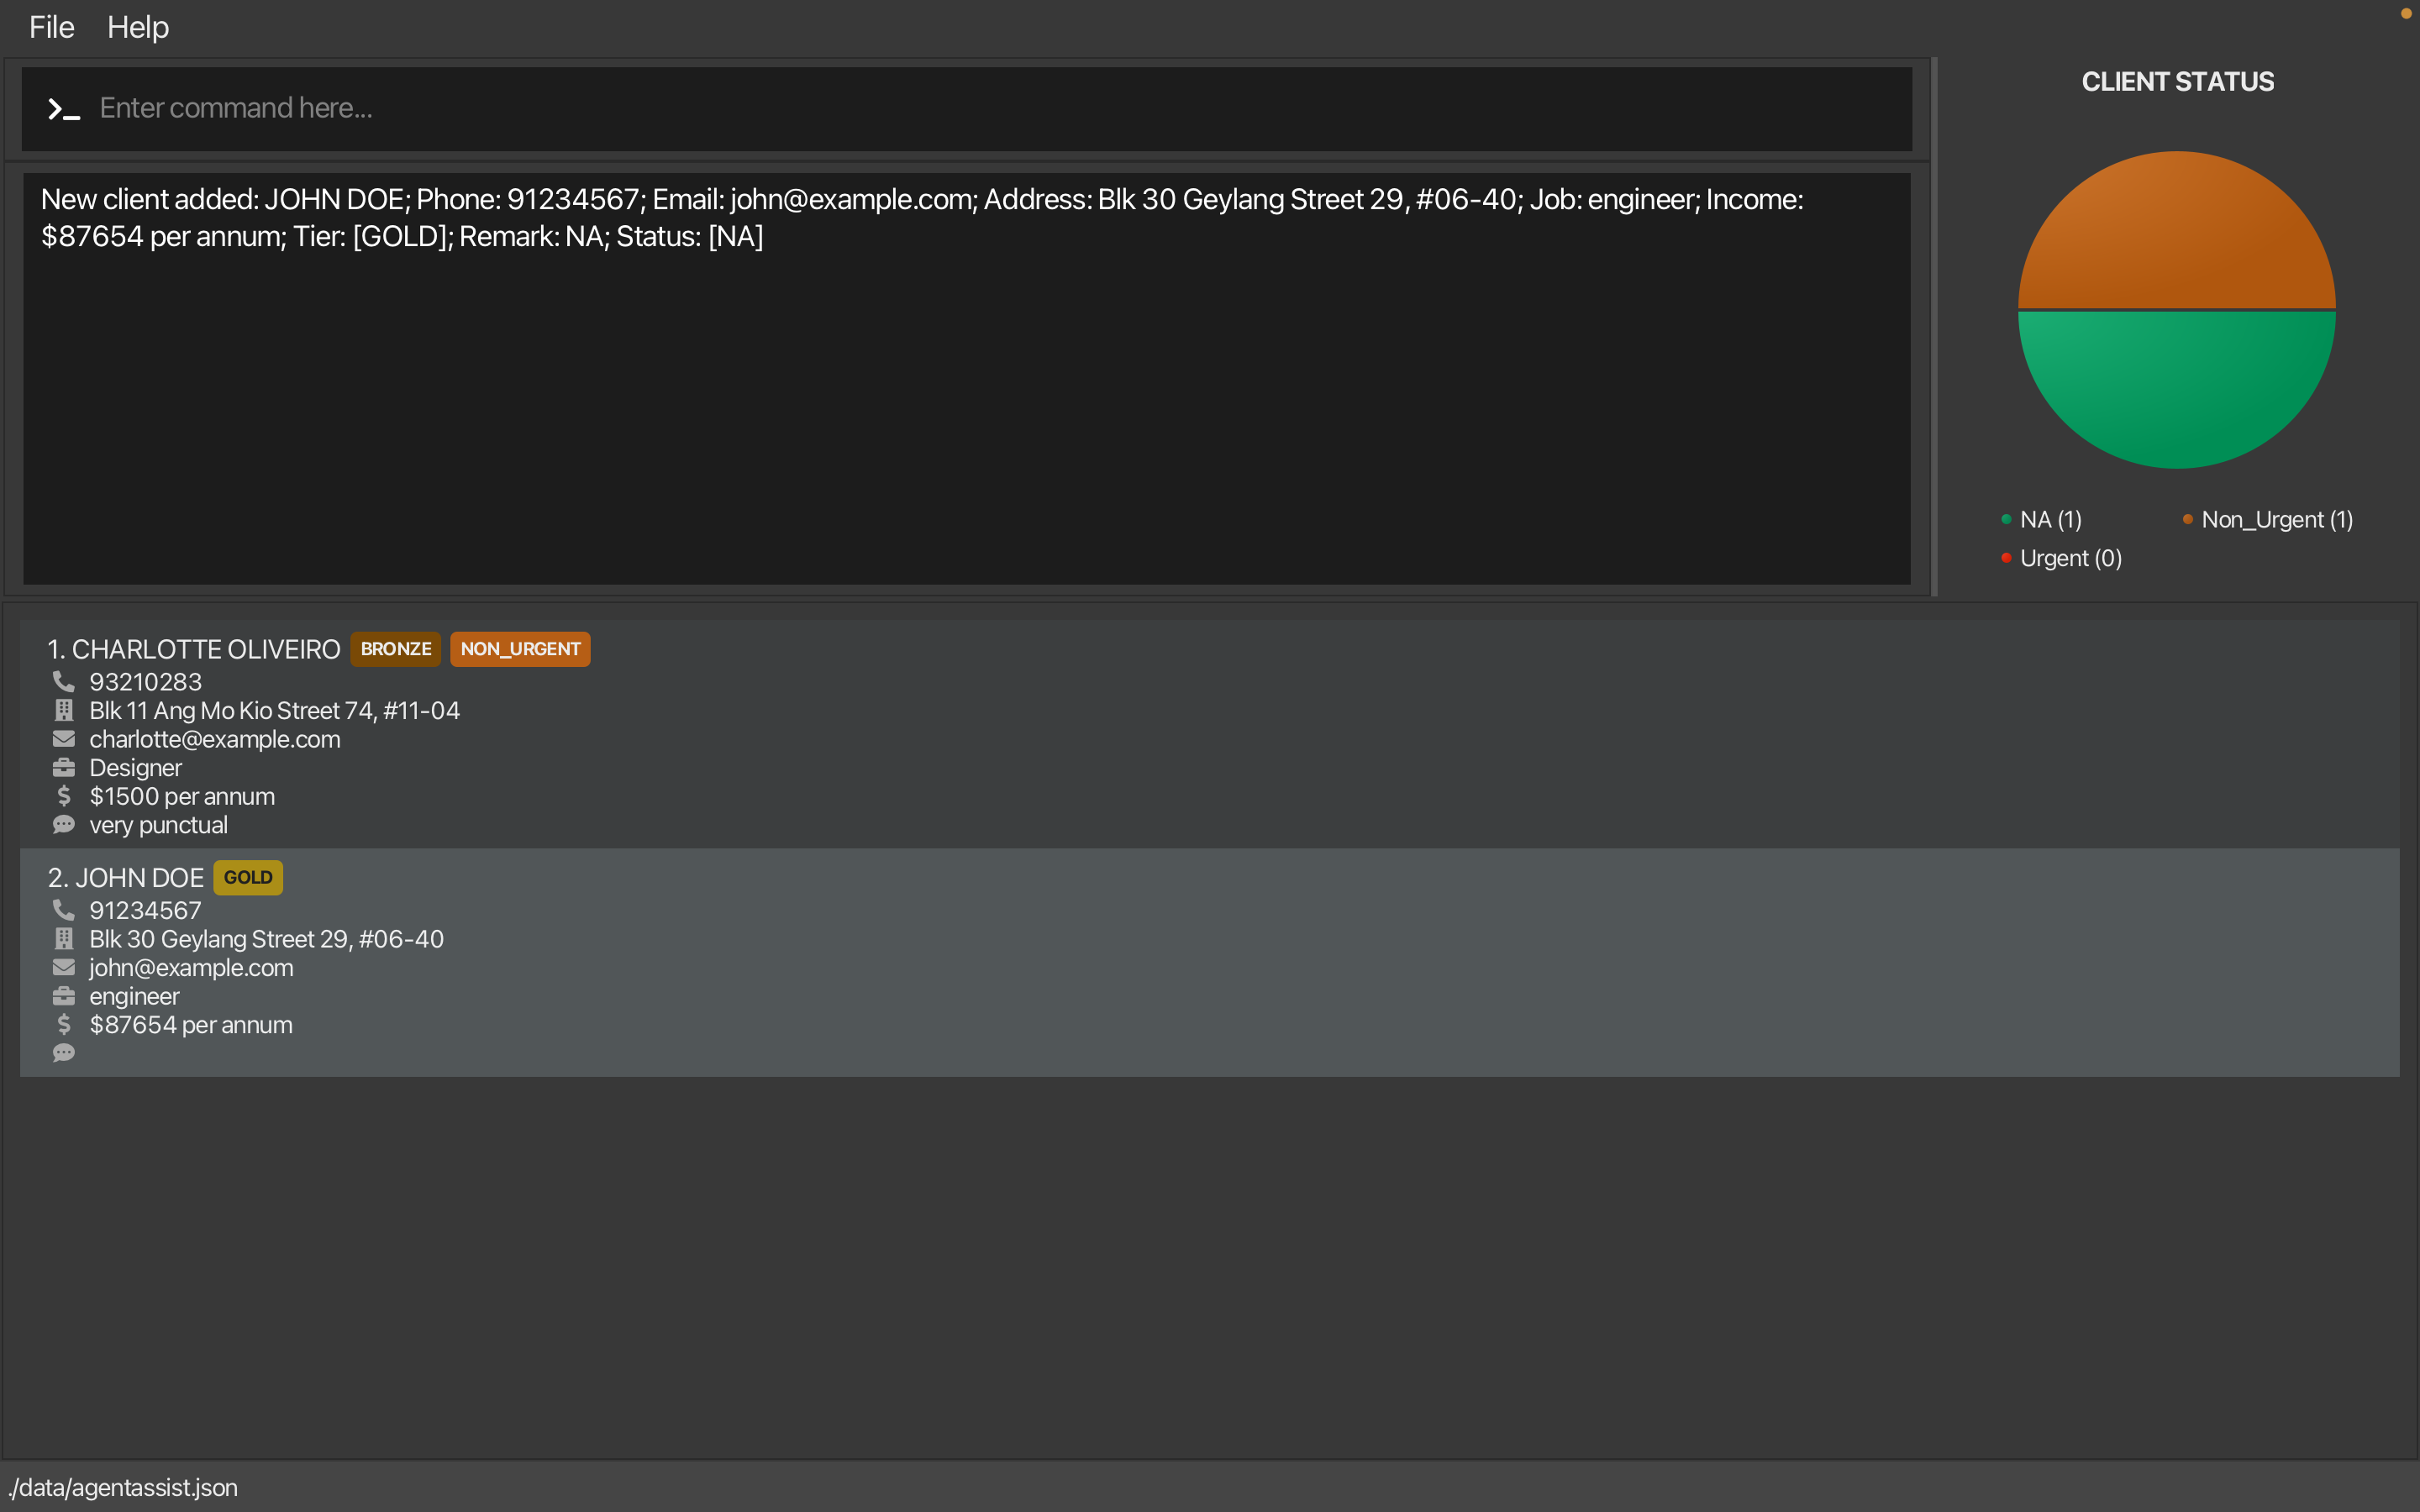
Tier,StatusorRemarkis not provided, they will be set to “NA” and displayed as such in the success message. - The image below shows the GUI before and after using
add n/ John Doe p/ 91234567 e/ john@example.com a/ Blk 30 Geylang Street 29, #06-40 j/ engineer i/ 87654 t/ gold: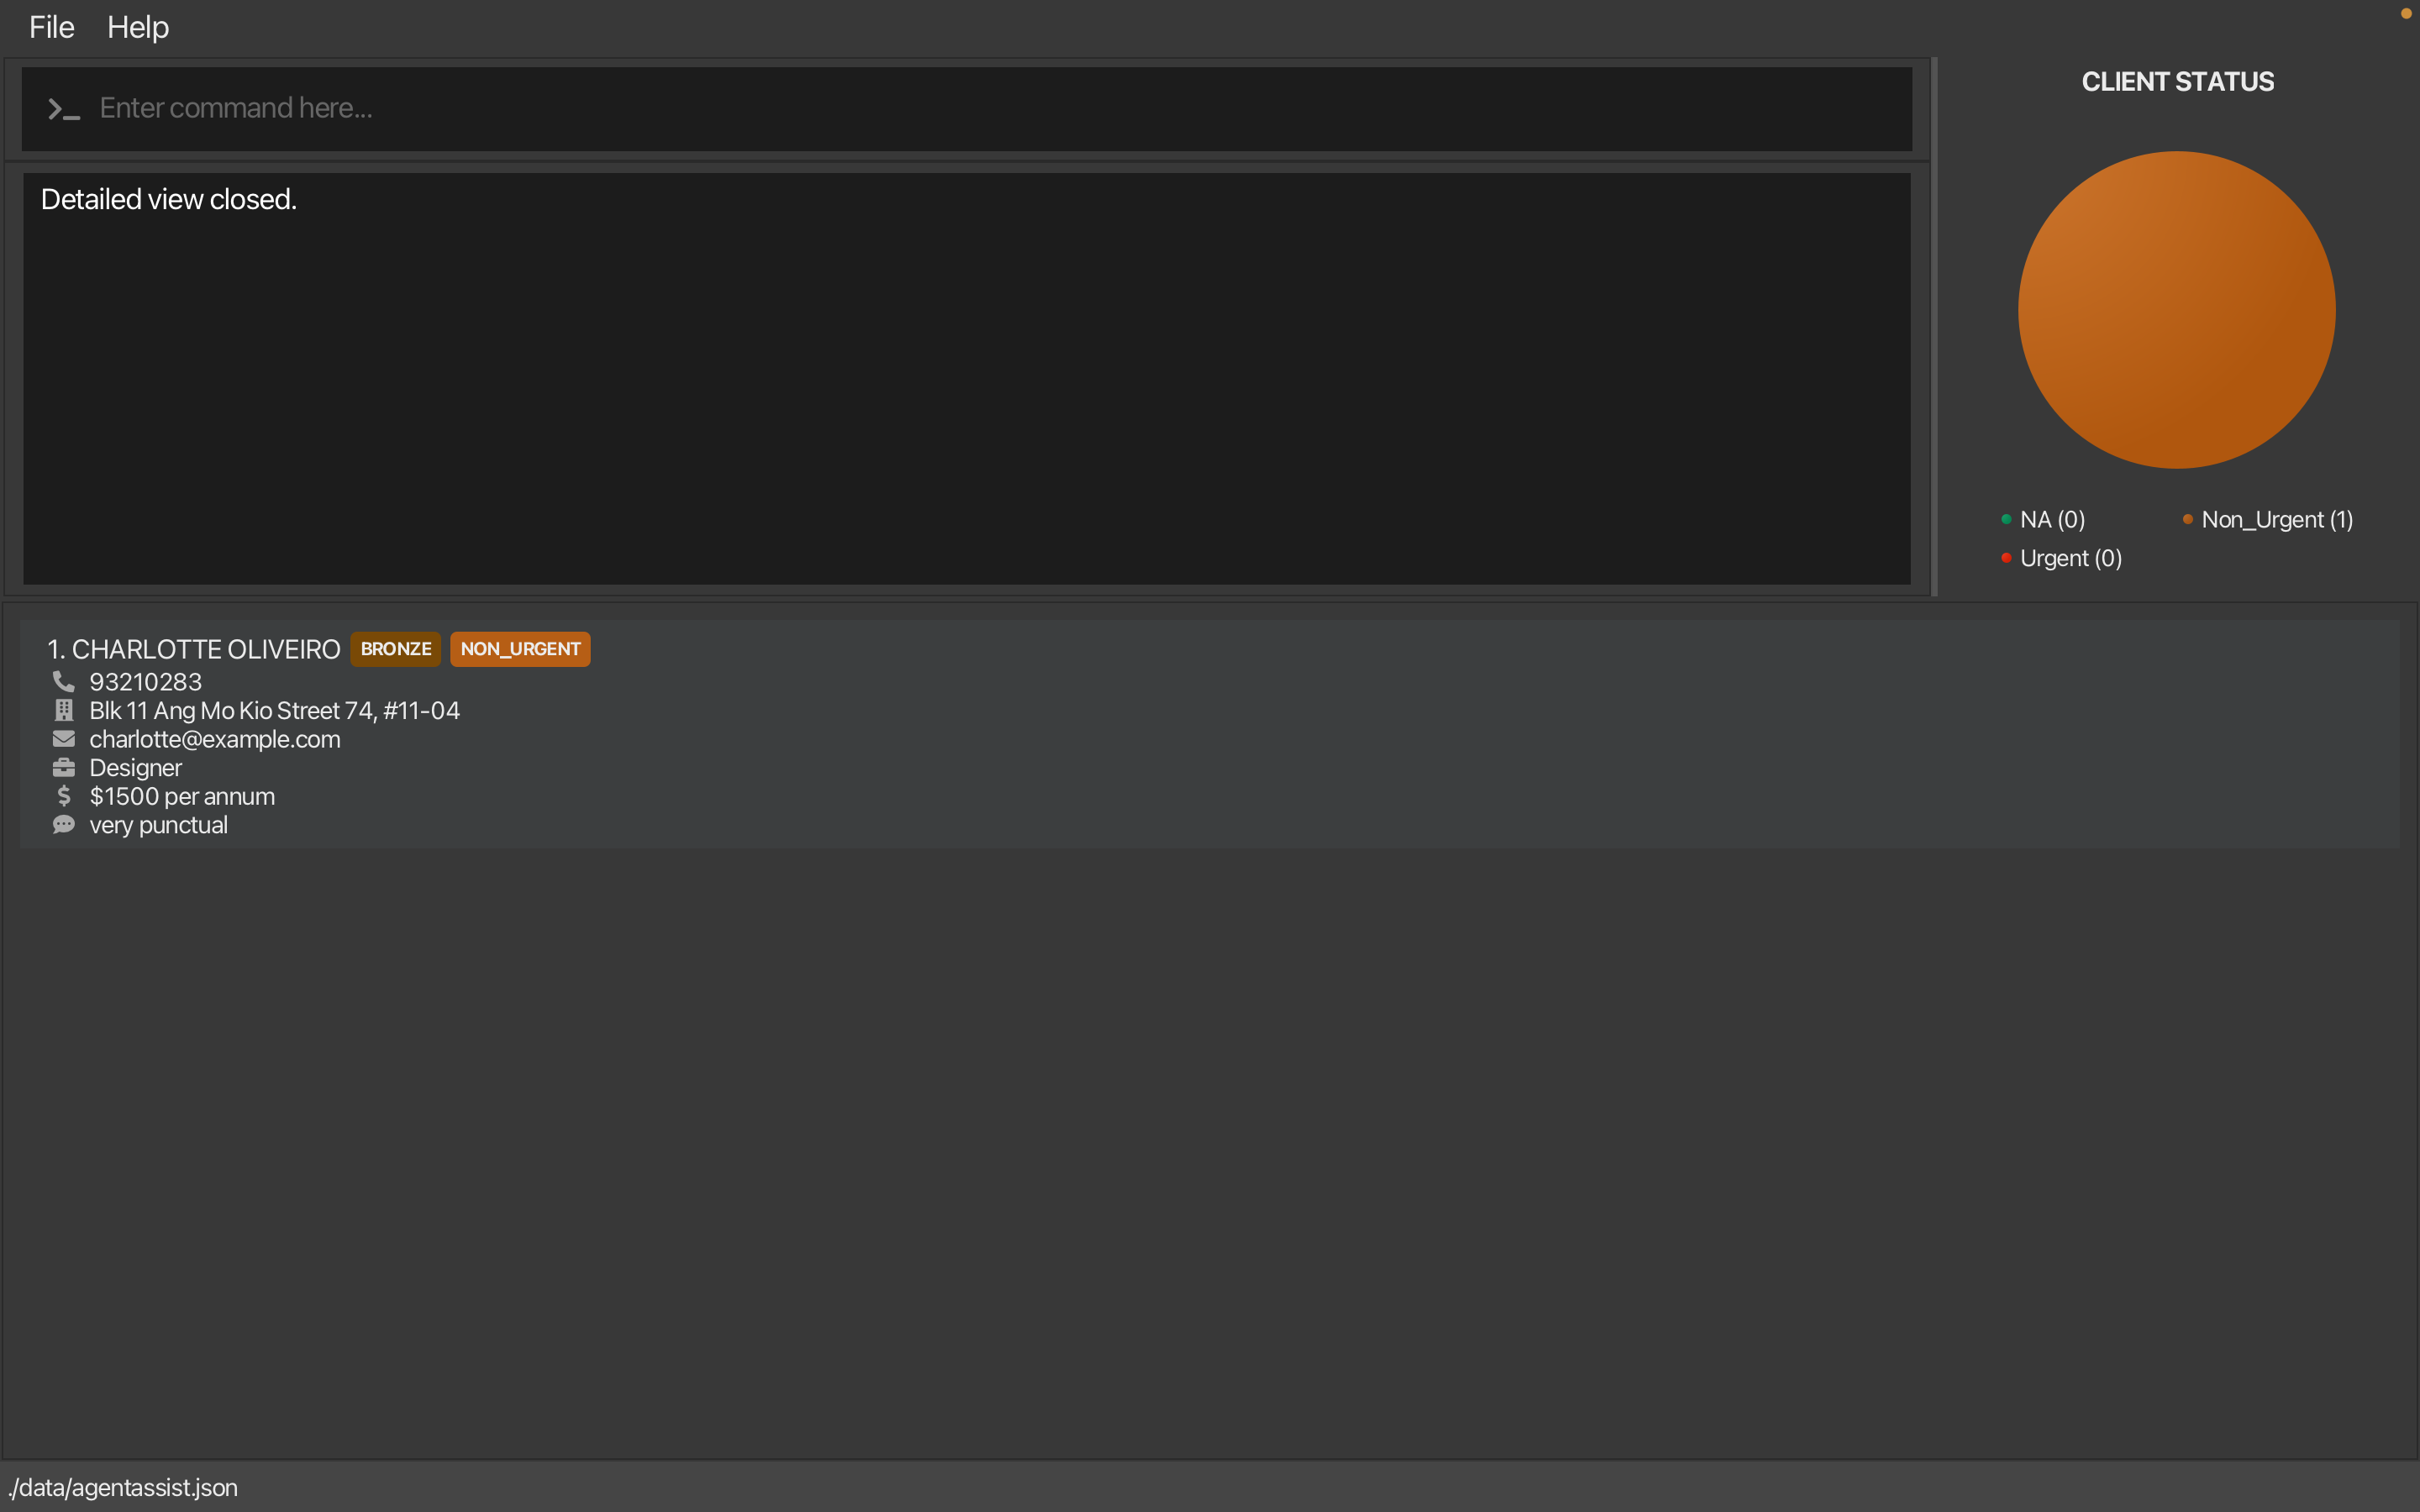 Before Add
 After Add
- Message:
- On Error
- Error caused by missing mandatory fields
- Message:
The following mandatory prefixes are missing: [...]
Invalid command format!
add: Adds a client to the address book. Parameters: n/ <NAME> p/ <PHONE> e/ <EMAIL> a/ <ADDRESS> j/ <JOB> i/ <INCOME> [t/ <TIER>]...
[r/ <REMARK>]...[s/ <STATUS>]...
Example: 'add n/ John Doe p/ 98765432 e/ johnd@example.com a/ 311, Clementi Ave 2, #02-25 j/ doctor i/ 300 t/ GOLD r/ He is very smart s/ NON_URGENT'
- Message:
- Error caused by invalid values for some fields
- Message:
Invalid command format!
<INDIVIDUAL FIELD'S ERROR MESSAGES>...
add: Adds a client to the address book. Parameters: n/ <NAME> p/ <PHONE> e/ <EMAIL> a/ <ADDRESS> j/ <JOB> i/ <INCOME> [t/ <TIER>]...
[r/ <REMARK>]...[s/ <STATUS>]...
Example: 'add n/ John Doe p/ 98765432 e/ johnd@example.com a/ 311, Clementi Ave 2, #02-25 j/ doctor i/ 300 t/ GOLD r/ He is very smart s/ NON_URGENT'
- Message:
- Error caused by missing mandatory fields
Note on Duplicates:
AgentAssist will prevent duplicate entries if a client with the same name, email and phone number is already saved. When this happens, you will see the following message:
This client already exists in the address bookThe duplicate contact will not be saved to prevent redundancy.
If you need to update details for an existing contact, use the
editcommand instead. For more information, see Section 6.2.2 Editing a client.
6.2.2 Edit an Existing Client’s Information
Purpose: Update the details of an existing client in the database.
All client information, including contact details, address, job information, and other relevant data, can be modified. You can also append to or replace existing remark(s) and adjust the client’s tier status.
Command Format:
edit <INDEX> [n/ <NAME>] [p/ <PHONE>] [e/ <EMAIL>] [a/ <ADDRESS>] [j/ <JOB>] [i/ <INCOME>] [t/ <TIER>] [rn/ <NEW REMARK>] [ra/ <REMARK TO BE APPENDED>] [s/ <STATUS>]
- Mandatory Field:
<INDEX>, at least one of the Optional Fields- Note: The provided index must be greater than 0, and less than or equal to the total number of clients in the list.
- More details can be found in Section 5.4.2 Non-Flag Arguments.
- Note: The provided index must be greater than 0, and less than or equal to the total number of clients in the list.
- Optional Fields:
n/,p/,e/,a/,j/,i/,t/,rn/,ra/,s/ - Note:
rn/(new remark(s)) andra/(append remark(s)) cannot be used simultaneously in a single command. Additionally, if multiple remarks are added using thera/prefix, only the first 3 remarks will be shown in the list view and the rest can only be seen after using the view command.
For detailed explanations of each flag and acceptable arguments, refer to Sections 5.3 Flags and 5.4 Arguments.
Examples:
- Edit only 1 specific field:
edit 12 a/ Ridge View Residential Collegeedit 12 t/ goldedit 12 s/ urgent - Edit multiple fields at the same time:
edit 12 p/ 99887766 e/ mrtan_newemail@ntu.sg j/ unemployed i/ 0 t/ reject - Append new remark(s) onto existing one:
edit 12 ra/ Recently received Gordon E. Moore Award - Replace all remark(s) with new remark(s):
edit 69 rn/ Do not call, angry about calls
What to Expect:
- On Success:
- Message:
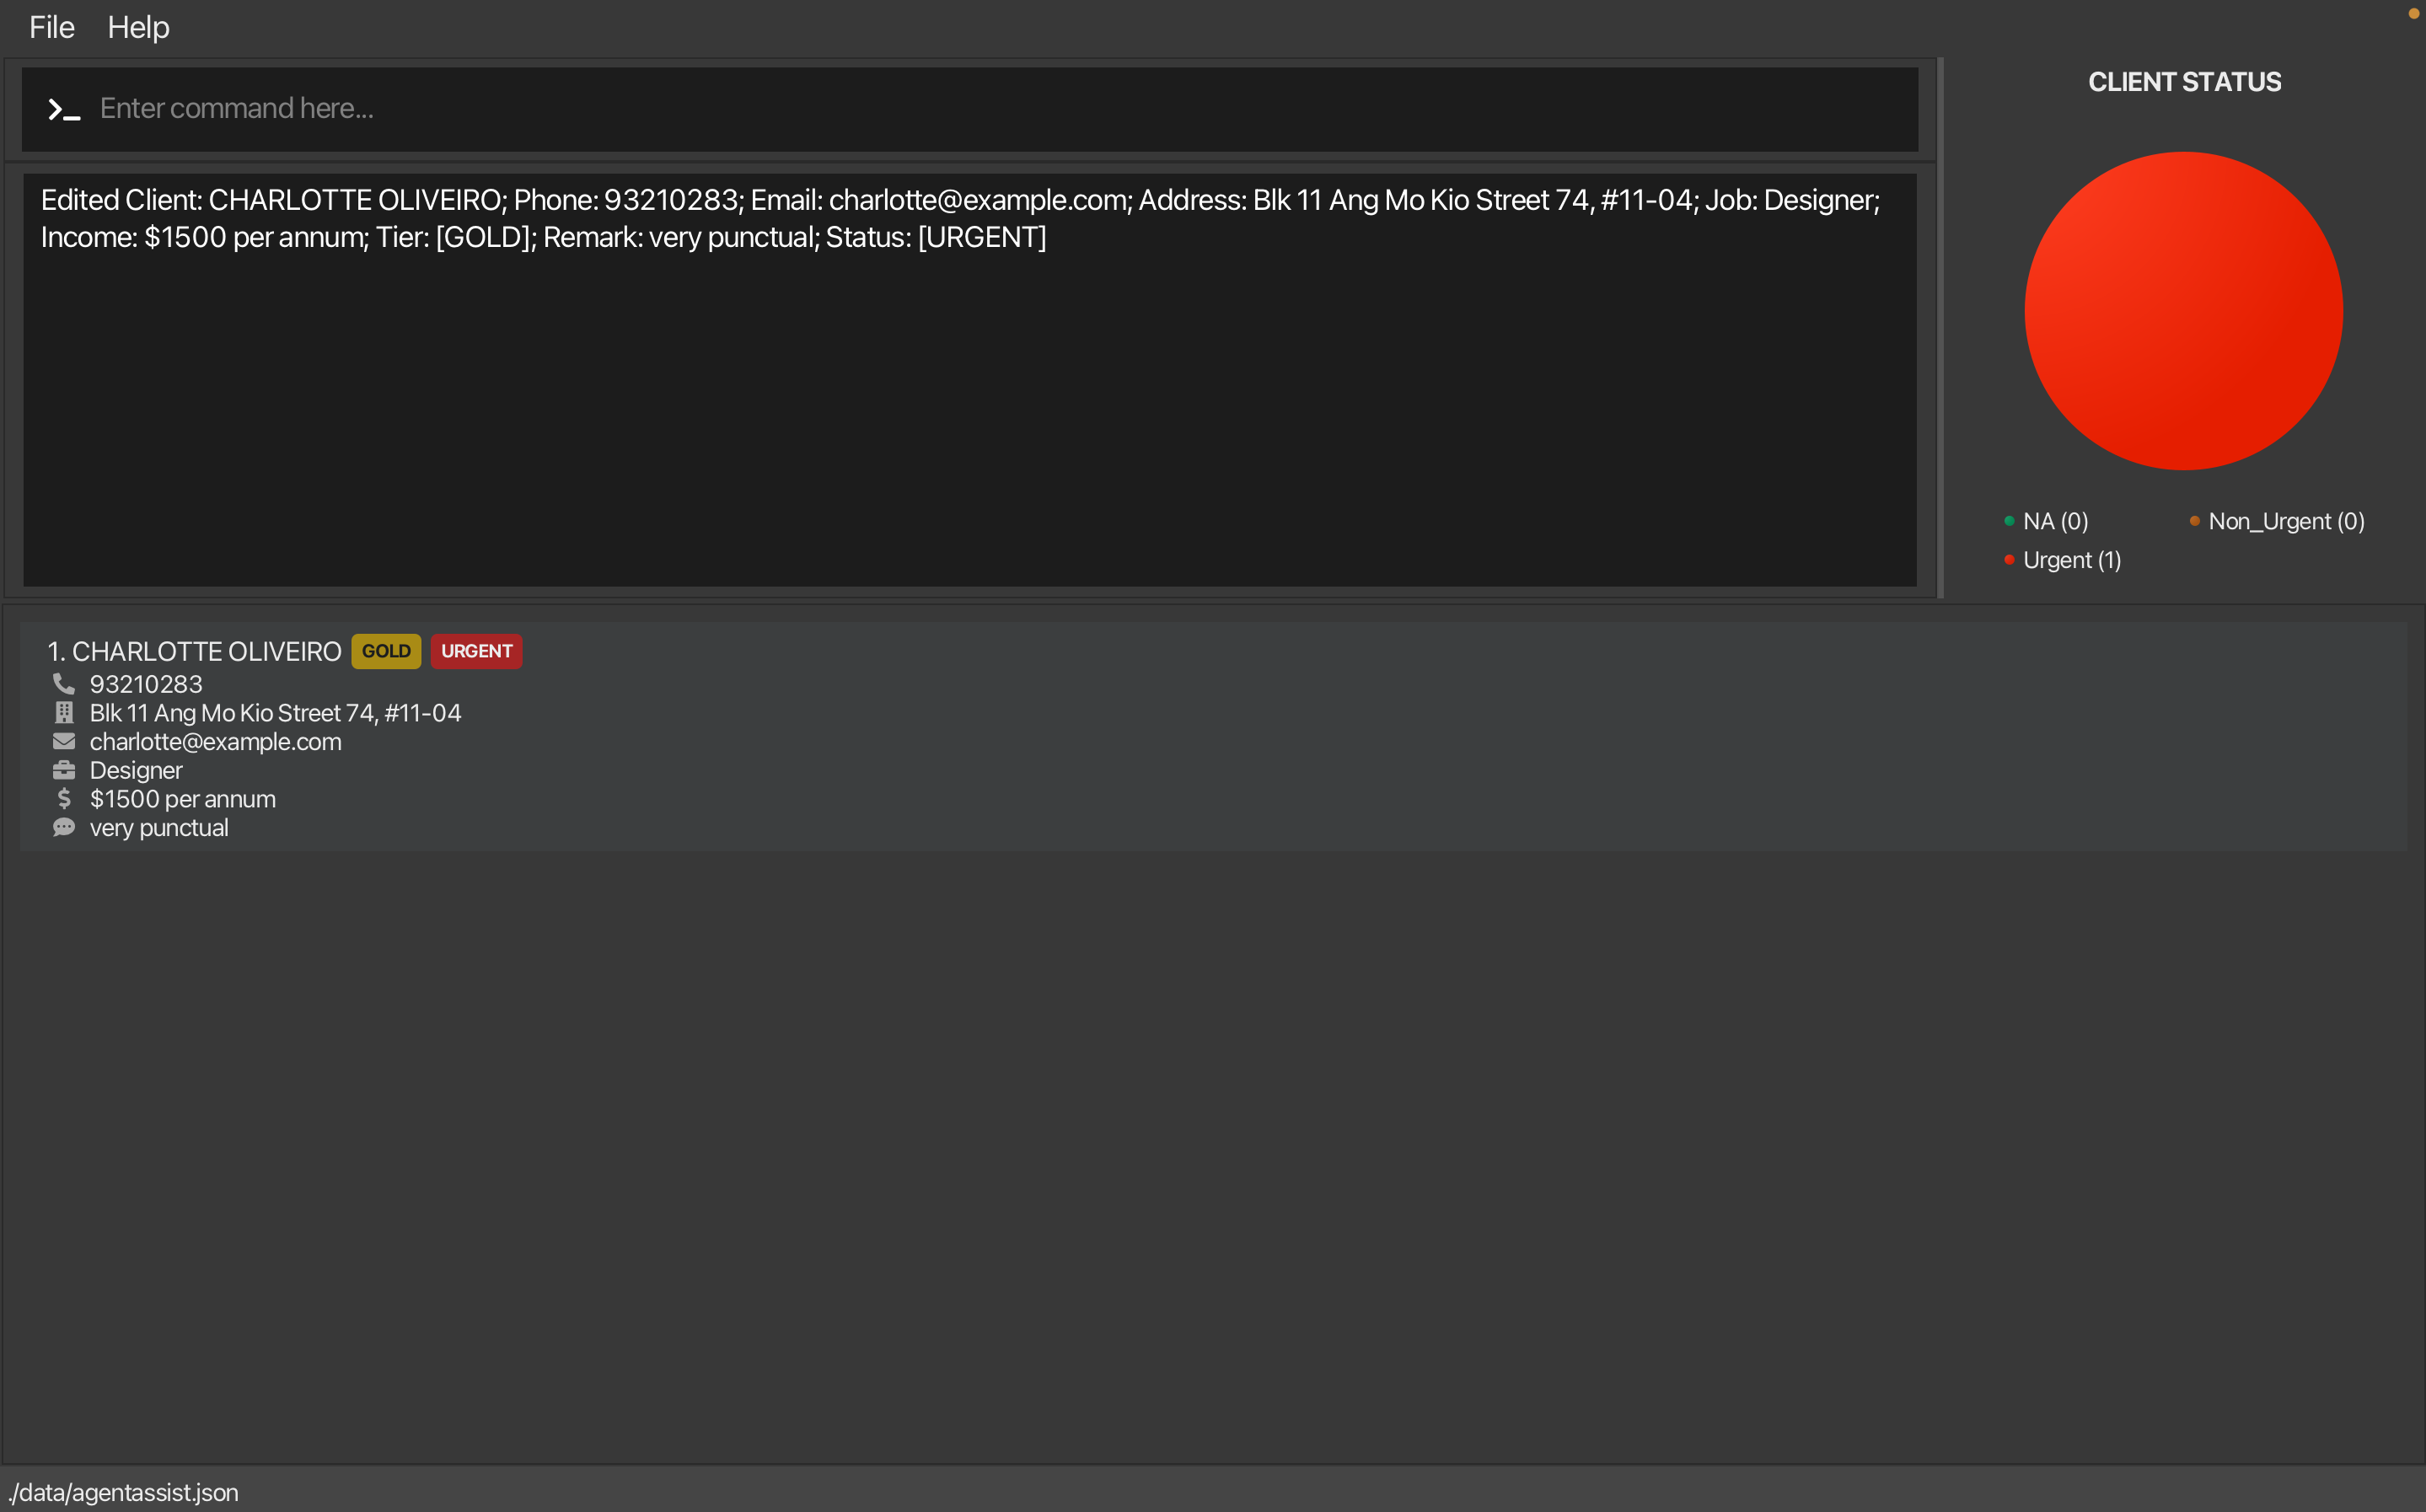
Edited Client: <CLIENT DETAILS> - The image below shows the GUI before and after using
edit 1 t/ gold s/ urgent: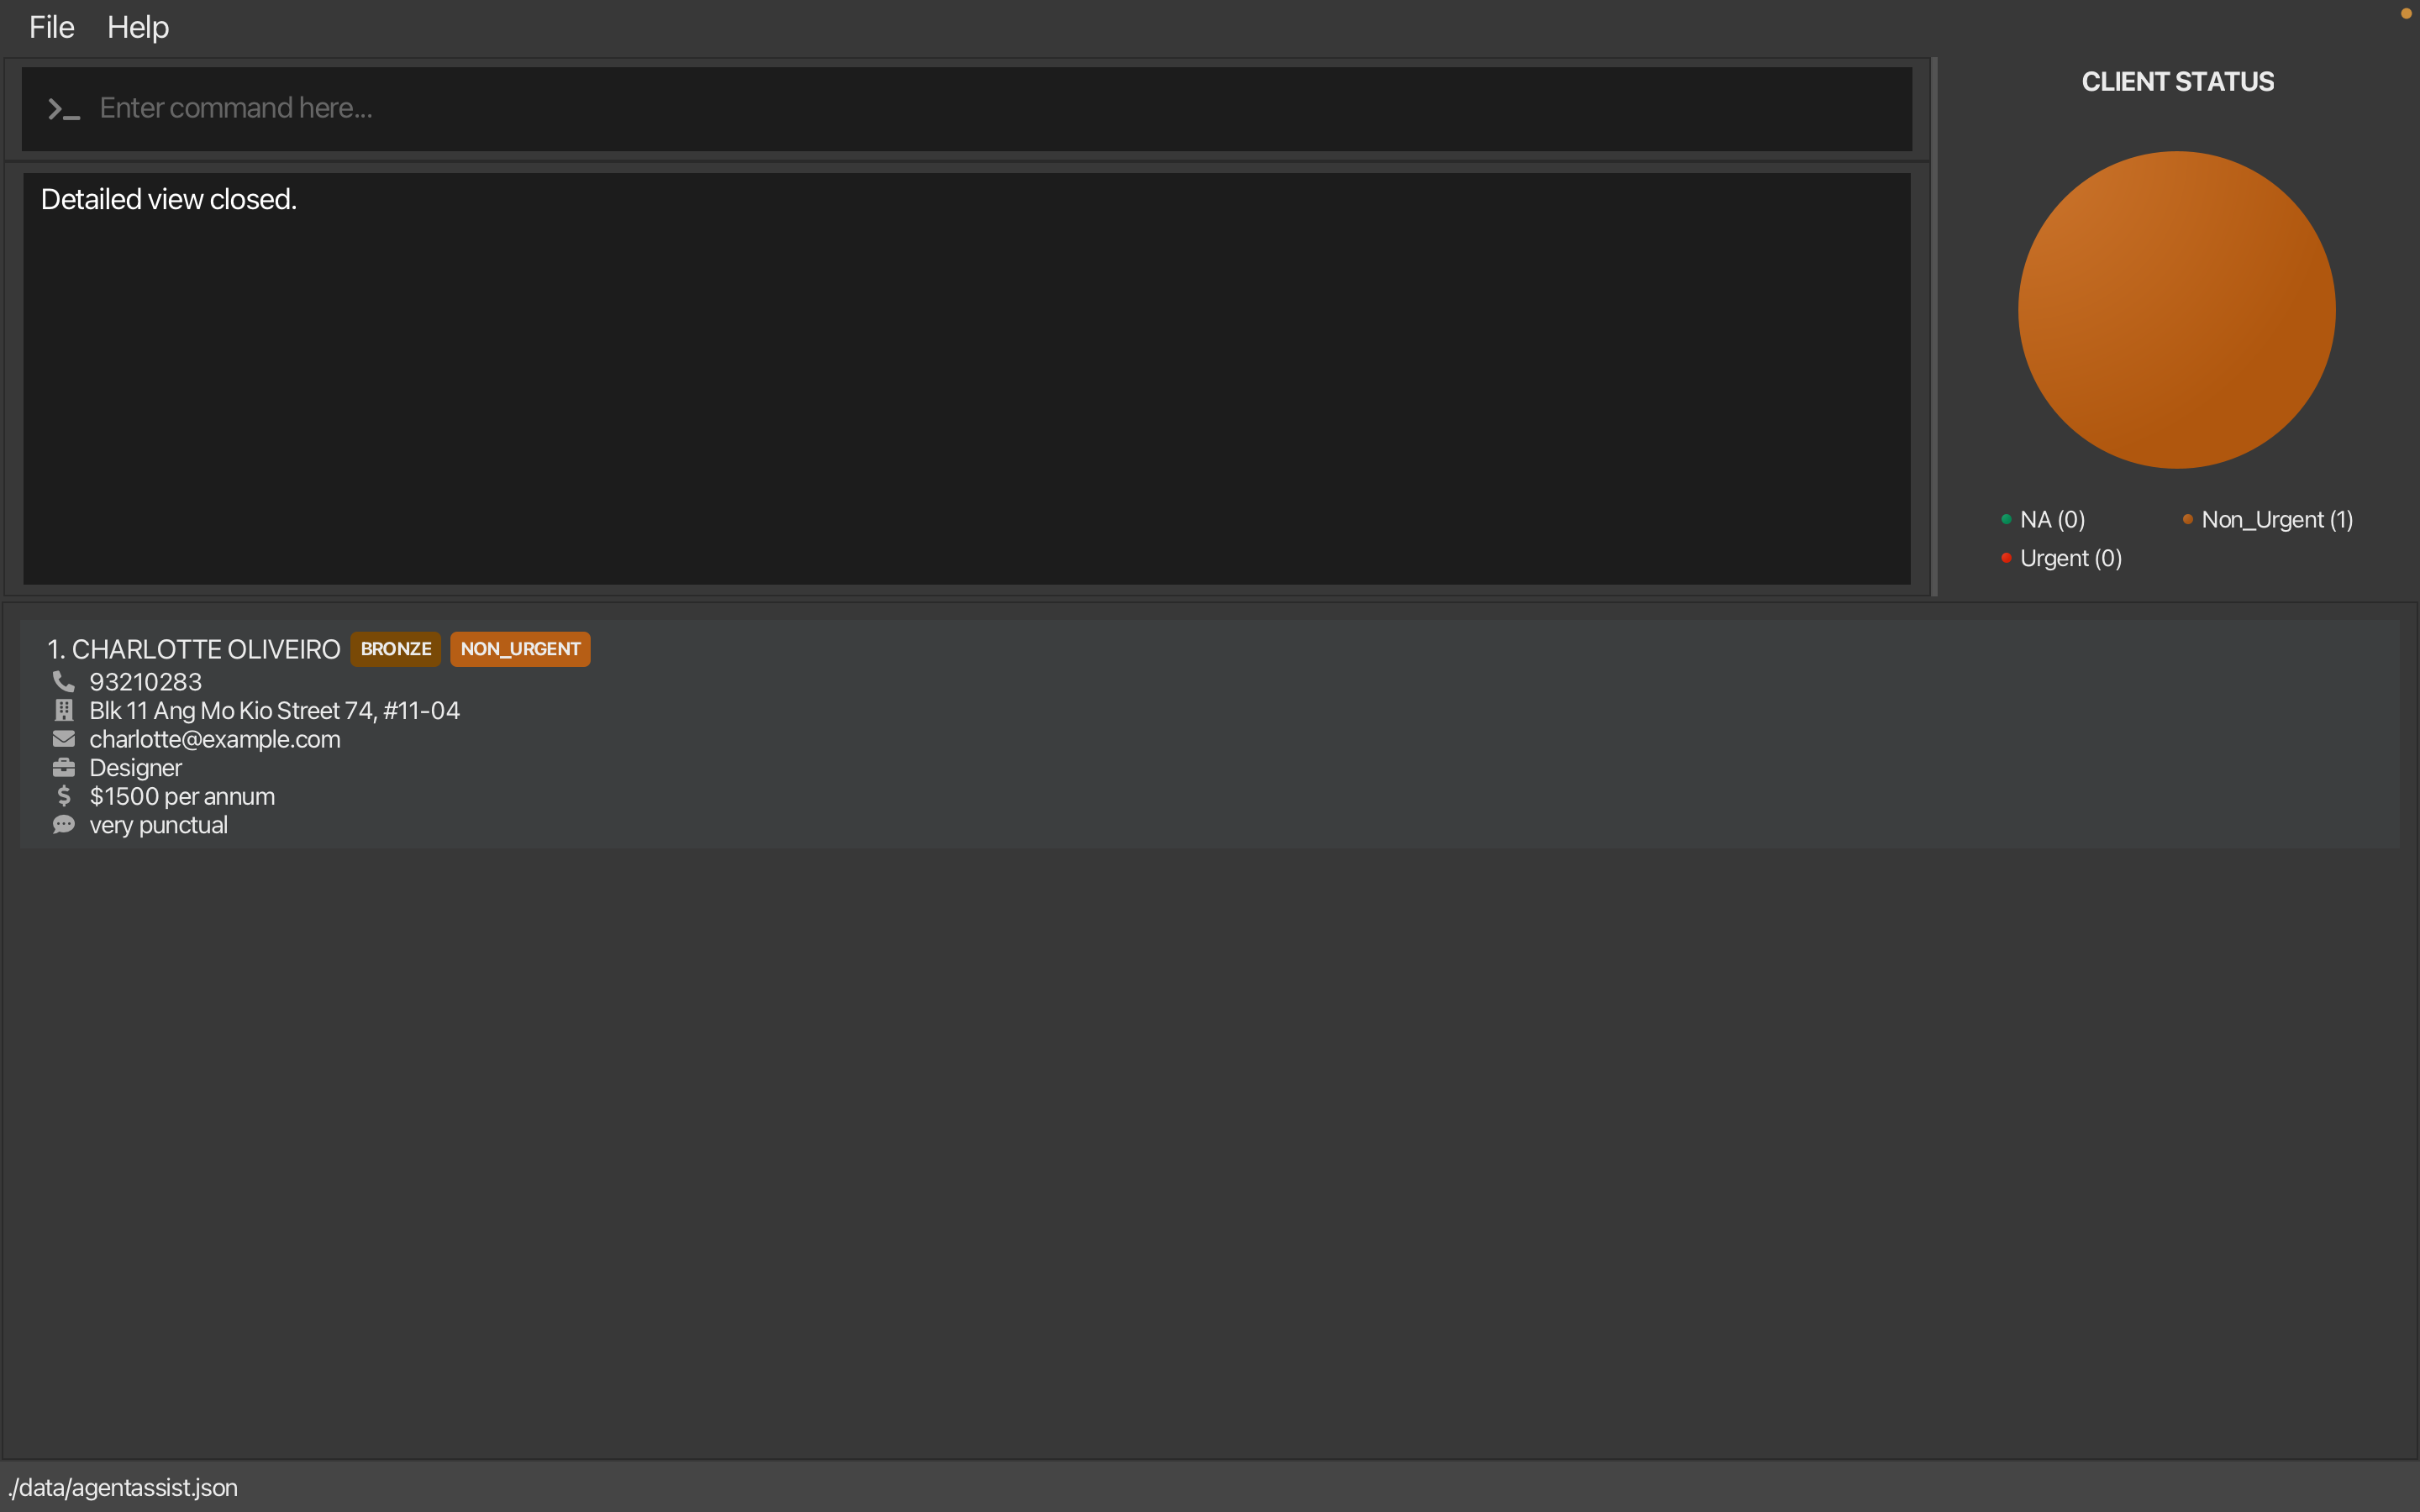 Before Edit
 After Edit
- Message:
- On Error:
- Error caused by invalid index
- Message:
Invalid command format!
edit: Edits the details of the client identified by the index number used in the displayed client list. Existing values will be overwritten by the input values. Any fields unspecified will not be modified.
Required Parameters: INDEX (must be a positive integer)
Optional Parameters: [n/ <NAME>] [p/ <PHONE>] [e/ <EMAIL>] [a/ <ADDRESS>] [j/ <JOB>] [i/ <INCOME>] [t/ <TIER>] [rn/ <NEW REMARK>] [ra/ <REMARK TO BE APPENDED>] [s/ <STATUS>]
Example Usage: 'edit 1 p/ 91234567 e/ johndoe@example.com'
- Message:
- Error caused by invalid values for some fields
- Message:
Invalid command format!
<INDIVIDUAL FIELD'S ERROR MESSAGES>...
- Message:
- Error caused by invalid index
💡 Pro Tip: No need to worry about duplicate indexes—AgentAssist guarantees that every client has a unique index automatically.
💡 Pro Tip: If the value for
Tier,StatusorRemarkis the default value (NA), it will not be shown. Thus,edit <INDEX> rn/ NAcan be used to remove all remarks for a given client.
6.2.3 Delete an Existing Client
Purpose: Remove records of clients who are no longer using your credit card services.
Command Format:
delete <INDEX>
- Mandatory Field:
<INDEX>- Note: The provided index must be greater than 0, and less than or equal to the total number of clients in the list.
- More details can be found in Section 5.4.2 Non-Flag Arguments.
- Note: The provided index must be greater than 0, and less than or equal to the total number of clients in the list.
- After entering the command, you will be asked for confirmation (y/yes) before deletion occurs.
For detailed explanations of each flag and acceptable arguments, refer to Sections 5.3 Flags and 5.4 Arguments.
Examples:
- Remove a client with a specific index (e.g. at index 12):
delete 12Confirmation prompt:
This will permanently delete this contact. Are you sure you want to execute this command? (y/n)
What to Expect:
- On Success (after confirming with y/yes):
- Message:
Deleted Client: <CLIENT DETAILS>
- Message:
- On Cancellation (if confirmation is declined):
- Message:
Command has been cancelled.
- Message:
- On Error:
- Error caused by invalid index
- Message:
Invalid command format!
delete: : Deletes the client identified by the index number used in the displayed client list.
Parameters: INDEX (must be a positive integer)
Example: 'delete 1'
- Message:
- Error caused by invalid index
💡 Pro Tip: As mentioned in the
editcommand above, there is no need to worry about duplicate indexes—AgentAssist guarantees that every client has a unique index automatically.
6.2.4 Delete All Existing Clients
Purpose: Delete all clients from the database, effectively resetting the application’s contact list.
Command Format:
clear
Confirmation prompt:
This will permanently clear all contacts. Are you sure you want to execute this command? (y/n)
What to Expect:
- On Success (after confirming with y/yes):
- Message:
AgentAssist's contacts have been cleared!The application will remove all client data from the list, effectively resetting the client database.
- Message:
- On Cancellation (if confirmation is declined):
- Message:
Command has been cancelled.
- Message:
- On Error:
- This command does not typically produce errors but will have no effect if there are no clients in the database to clear.
6.3 Data Filtering Commands
6.3.1 List All Clients
Purpose: View a list of all clients saved in AgentAssist.
Command Format:
list
- No parameters are required for this command. Any parameter added will be ignored.
6.3.2 Filter Clients by Details / Find a Client
Purpose: Search for clients by specific details such as name, address, email, phone number, job title, income, remarks or status.
Command Format:
filter [n/ <NAME>] [p/ <PHONE>] [e/ <EMAIL>] [a/ <ADDRESS>] [j/ <JOB>] [r/ <REMARK>] [t/ <TIER>] [i/ (=/</>) <INCOME>] [s/ <STATUS>]
- Mandatory Field: One or more flags with corresponding search terms. The search term cannot be left empty.
- Special Syntax for Income (i/):
- When filtering by income, use comparison operators
=,>, or<to specify criteria. - Example:
i/ >5000will filter clients with an income greater than 5000. - See Matching Criteria for Income for more information.
- When filtering by income, use comparison operators
For detailed explanations for the matching criteria of each flag and the acceptable arguments, scroll down to Matching Criteria & Filter Behavior and refer to Sections 5.3 Flags and 5.4 Arguments.
Examples:
- Filter clients by name:
filter n/ John Doe - Filter clients by job:
filter j/ doctor - Filter clients by status:
filter s/ urgent - Filter clients by name, job and remark(s):
filter n/ Gordon Moore j/ doctor r/ award winner
Matching Criteria & Filter Behavior:
- Name/Address/Job/Remarks (Substring Matching):
- Searches in these fields use substring matching, where the search term must match a portion of the field in the exact order it appears in the client record.
- Example:
If a client’s name is
Gordon Moore, search terms likeGordon,Moore, orGordon Moorewill match, butMoore Gordonwill not.
- Email Address (Substring Matching):
- To filter by email address, enter a valid email in the required format (refer to 5.4 Arguments). This will return substring matches for the email provided.
- Example: Entering
emily@gmailoremily@gmail.cowill matchemily@gmail.com, as partial matches within a valid email format are allowed. However, inputs likeemilywill be rejected, as they do not meet the full email format requirement.
- Phone Number (Exact Match):
- To filter by phone number, enter a complete and valid phone number (refer to 5.4 Arguments). This filter requires an exact match with the specified phone number.
- Example: If a client’s phone number is
92601234, only the exact format92601234will match. Variations such as82601234will not match, and inputs that are not valid phone numbers, like9260,9260 1234, or12601234, will not be accepted.
- Tier/Status (Prefix Matching):
- Searches in these fields use prefix matching, meaning the search term must match the beginning of the field exactly.
- Example:
If a client has a tier labeled
Gold, a search fort/ Gort/ Goldwill match, butt/ ldort/ Gold Premiumwill not.
- Income (Using Comparison Operators):
-
Filtering by income allows numeric comparisons using operators
=,>, or<to find clients whose income meets certain criteria. -
Equal to (
=): Use=to find clients with a specific income. Example:i/ =5000will match clients with an income of exactly 5000. -
Greater than (
>): Use>to find clients with an income higher than the specified threshold. Example:i/ >5000will match clients with incomes greater than 5000. -
Less than (
<): Use<to find clients with an income lower than the specified threshold. Example:i/ <5000will match clients with incomes below 5000.
-
What to Expect:
- On Success:
- Message:
x client(s) listed!where
xis the number of matching results. - The image below shows the GUI before and after using
filter t/ gold s/ urgent: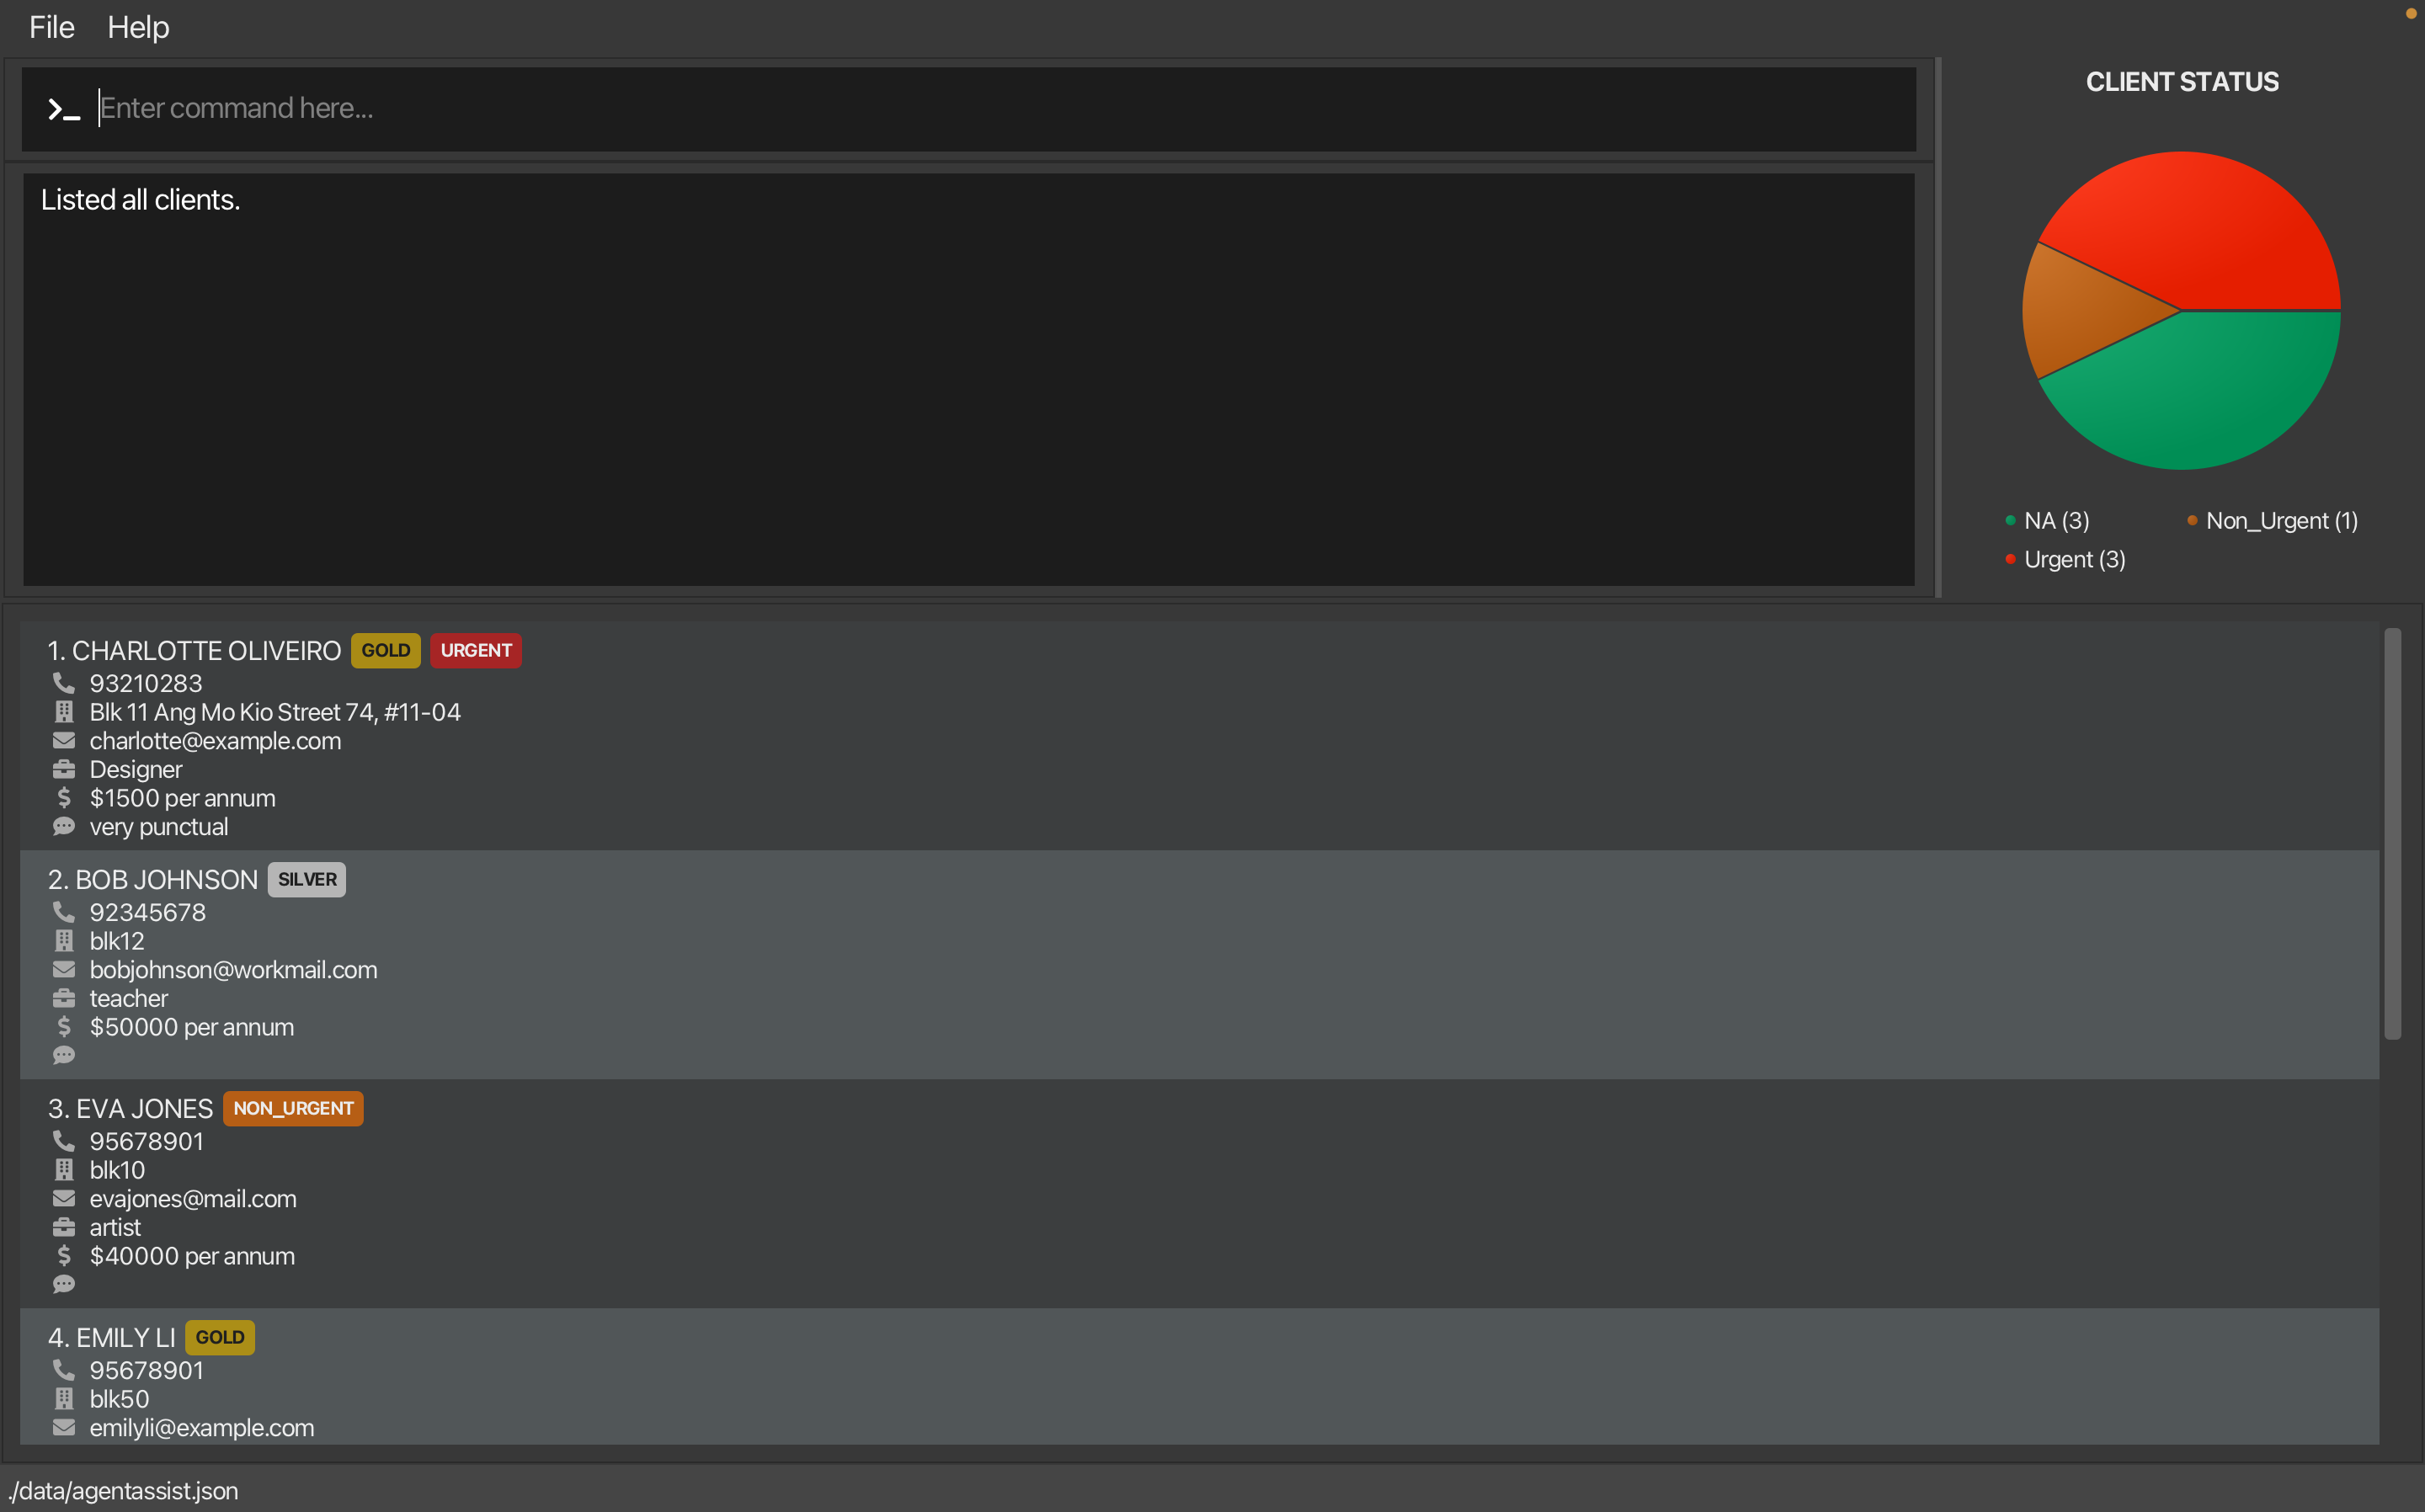 Before Filter
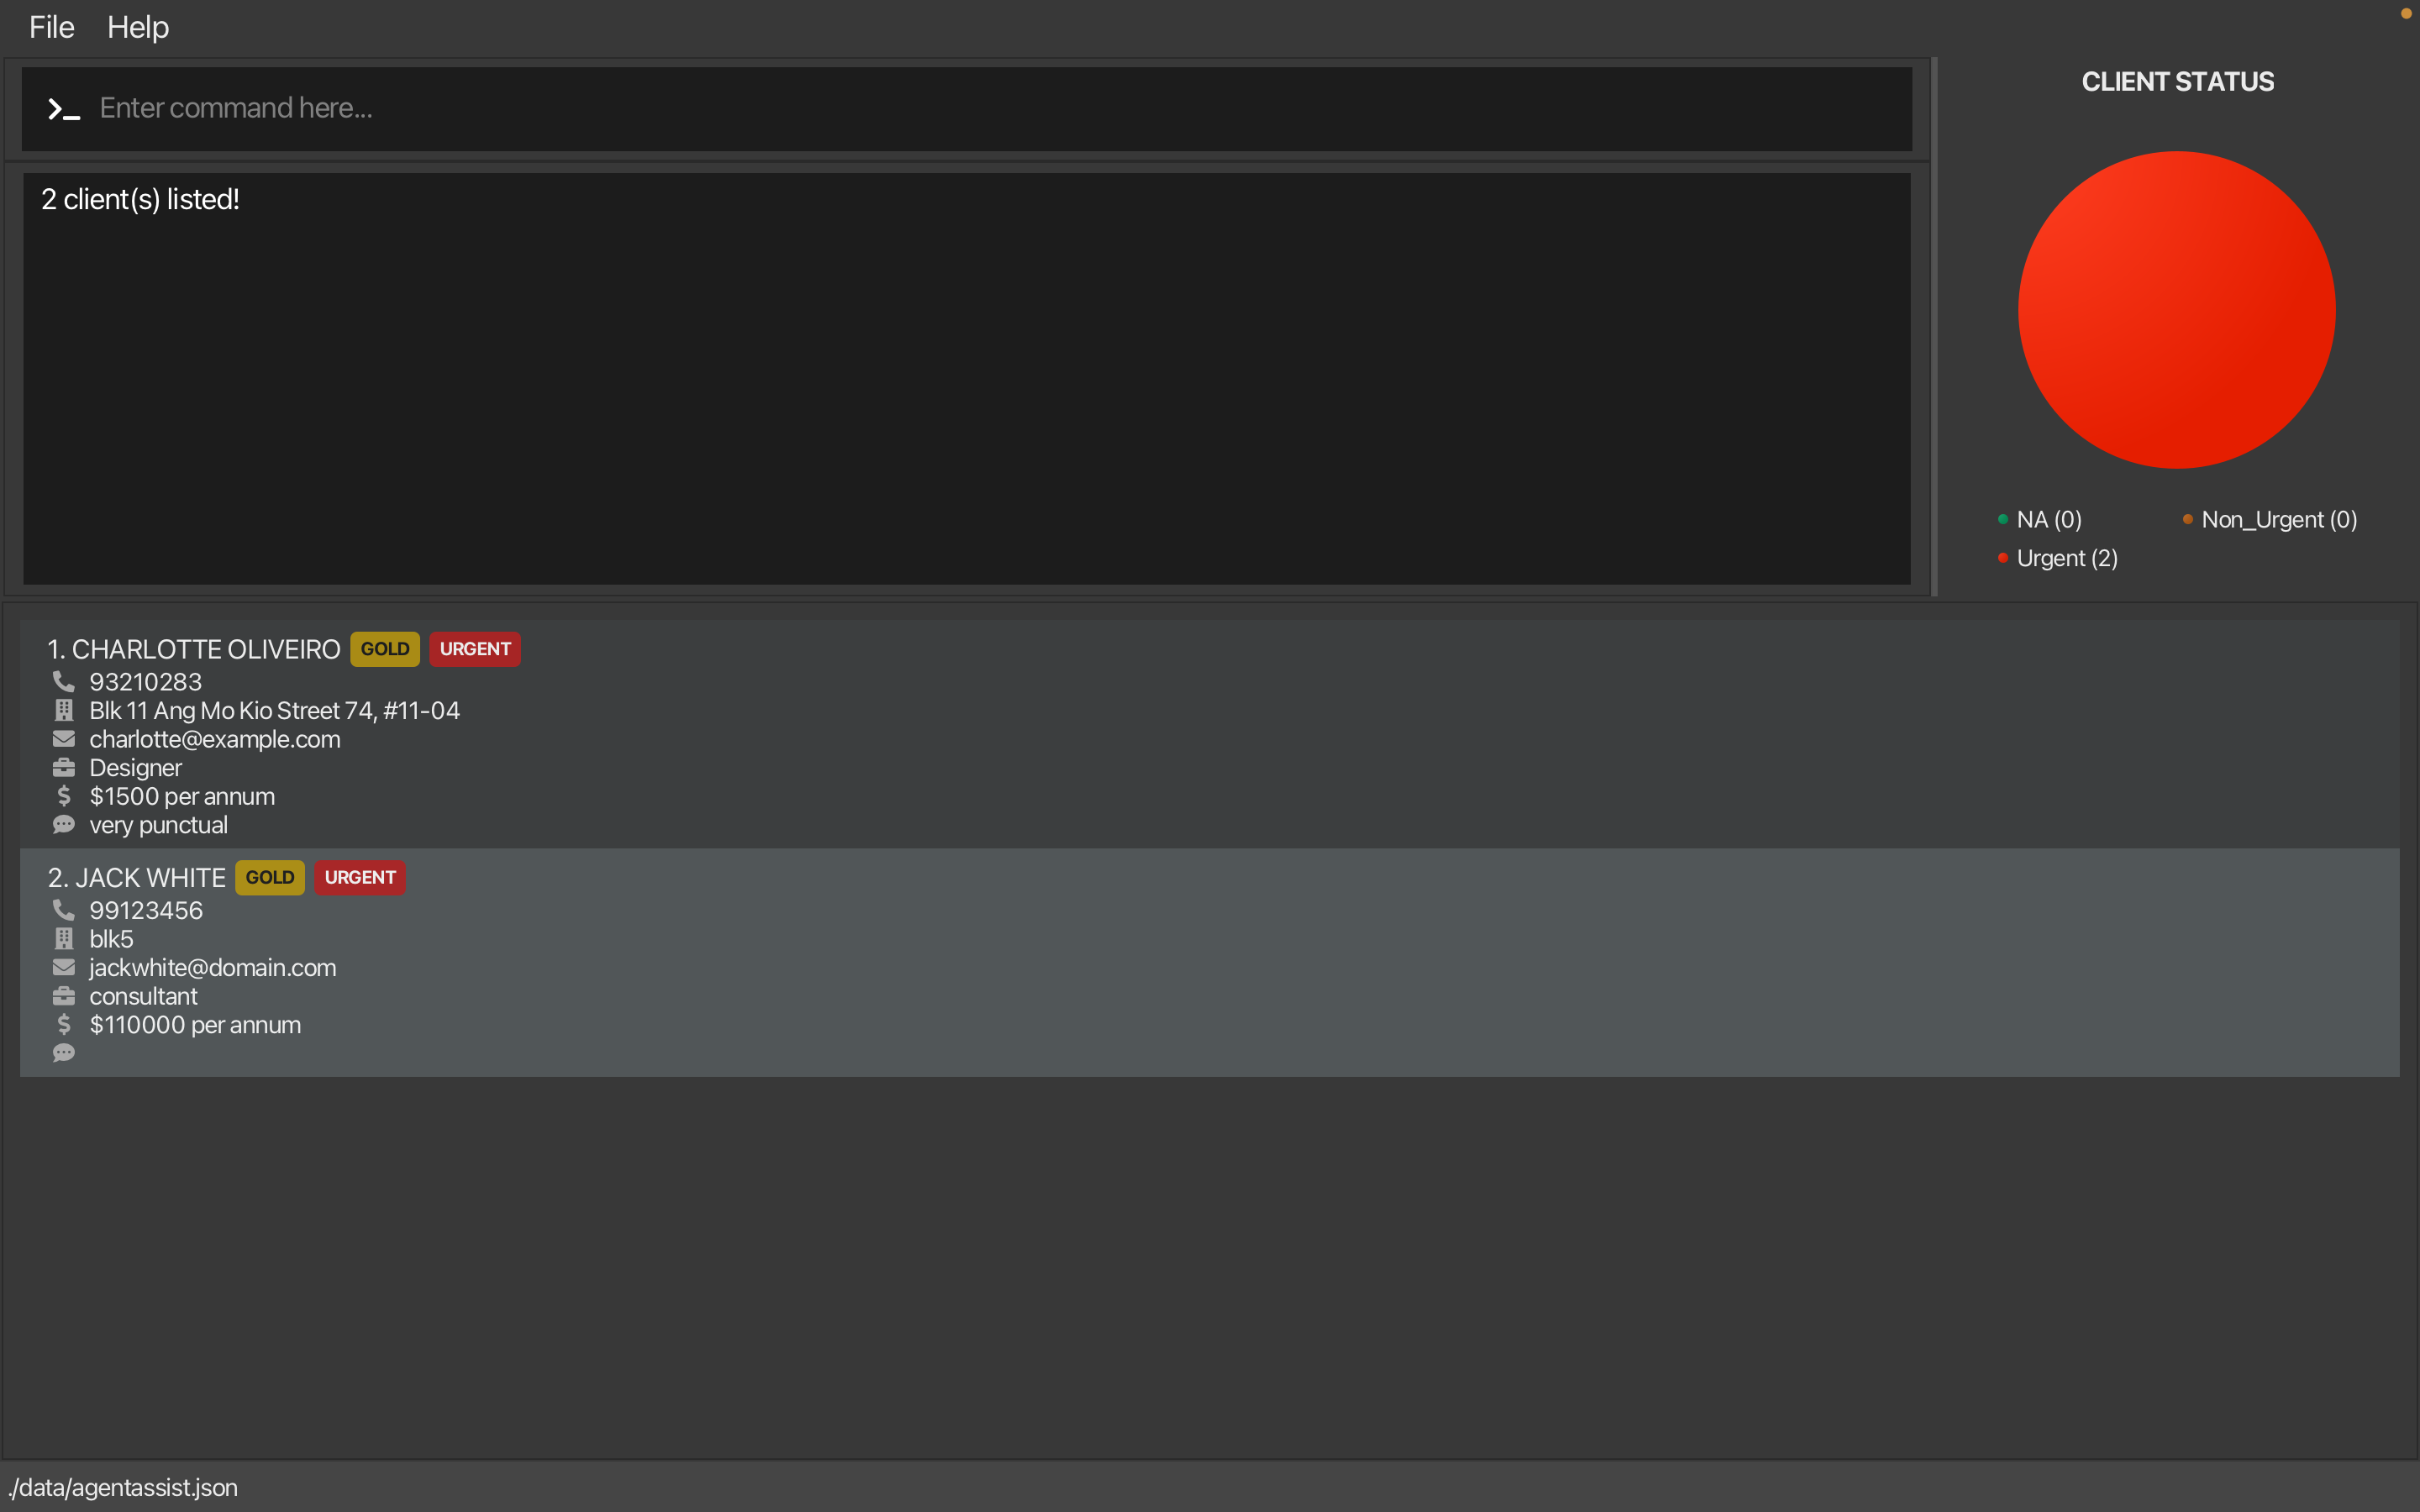 After Filter
- Message:
- On Error:
- If no valid flags are used:
- Message:
Invalid command format!
filter: Searches for all clients whose specified field contains the given substring (case-insensitive) and displays the results in a numbered list.
Parameters: <FLAG>/ <SEARCH TERM>
Flags: n/ <NAME>, p/ <PHONE>, e/ <EMAIL>, a/ <ADDRESS>, j/ <JOB>, i/ (=/</>) <INCOME> r/ <REMARK> t/ <TIER> s/ <STATUS>
Example: filter n/ Alice p/ 9111222
This will find all clients whose names contain 'Alice' and whose phone number is '91112222'.
- Message:
- If a search term fails to meet the requirements (e.g., invalid phone number length), the system will display usage hints specific to all the invalid search terms.
- If no valid flags are used:
6.4 General Commands
6.4.1 Viewing a Client’s Details
Purpose: View the full details of a selected client in a split view that displays comprehensive information including remark(s) and additional details.
Command Format:
view <INDEX>
- Mandatory Field:
<INDEX>- Note: The provided index must be greater than 0, and less than or equal to the total number of clients in the list.
- More details can be found in Section 5.4.2 Non-Flag Arguments.
- Note: The provided index must be greater than 0, and less than or equal to the total number of clients in the list.
Examples:
- View client no.1
view 1This will open a split view showing detailed information for the client at index 1.
What to Expect:
- On Success:
- A split view opens showing the selected client’s complete information.
- The main list remains visible and functional on the left while detailed information appears on the right.
- The images below show the GUI before and after using
view 1: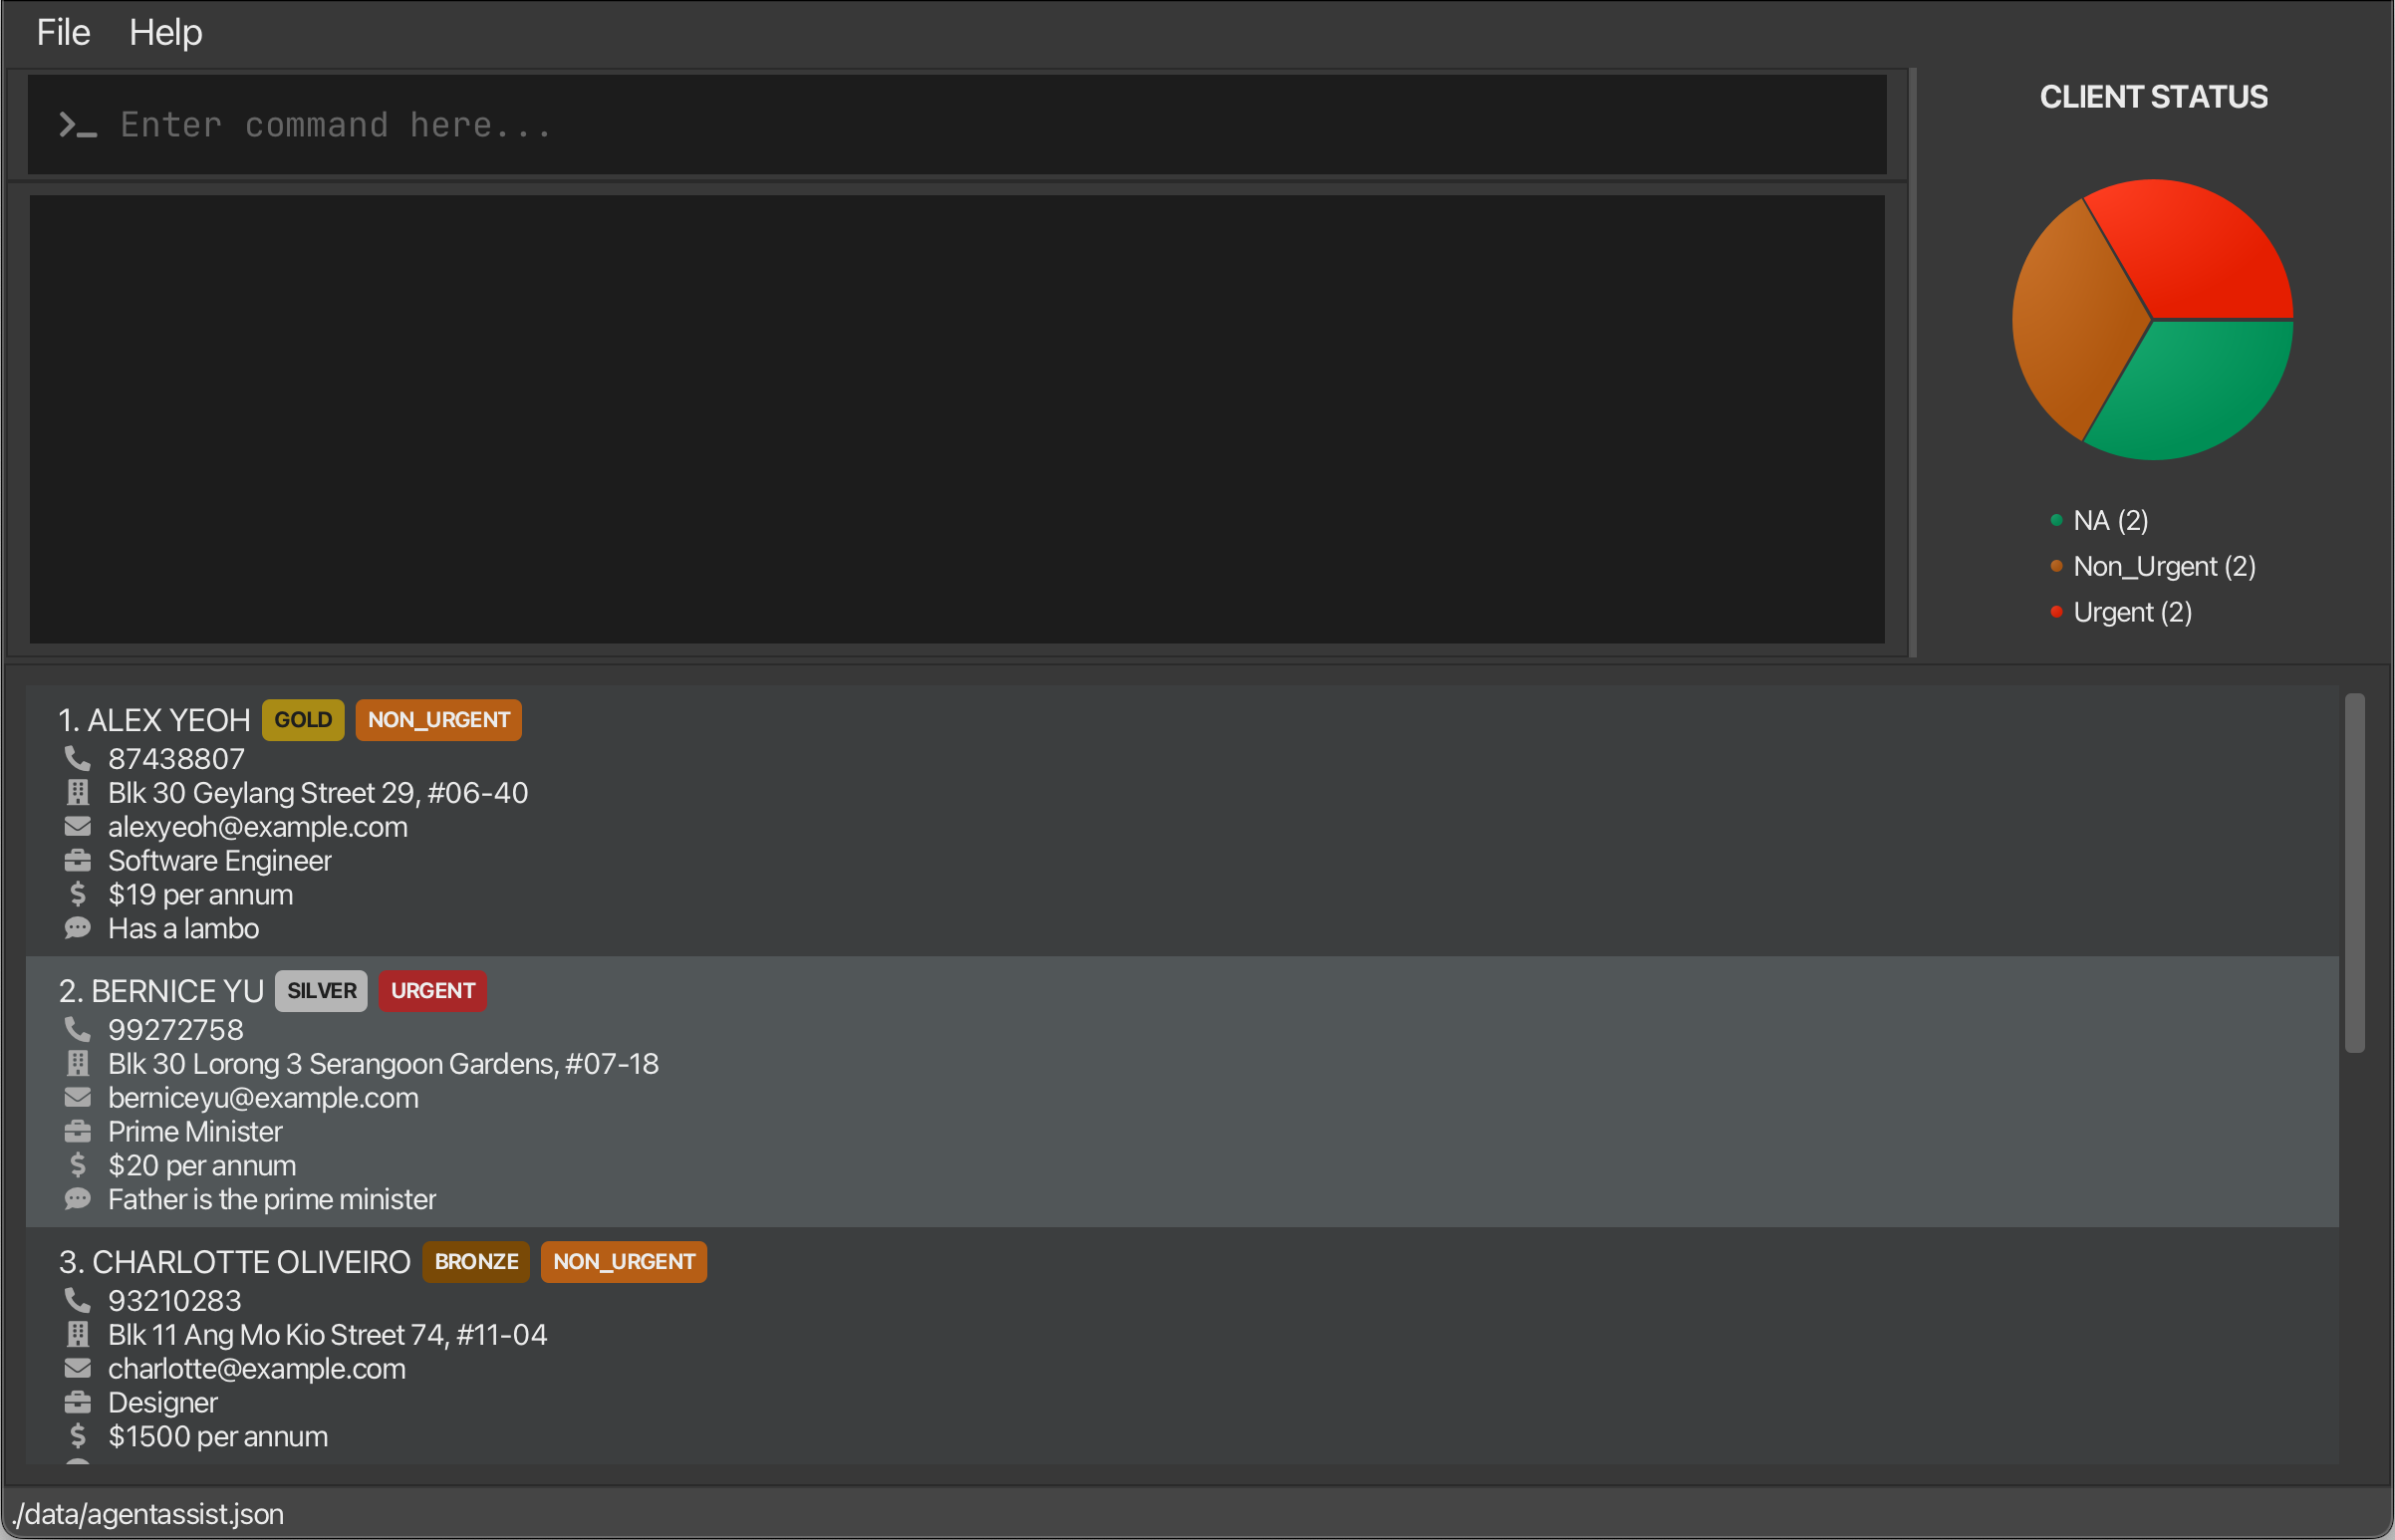
Before View 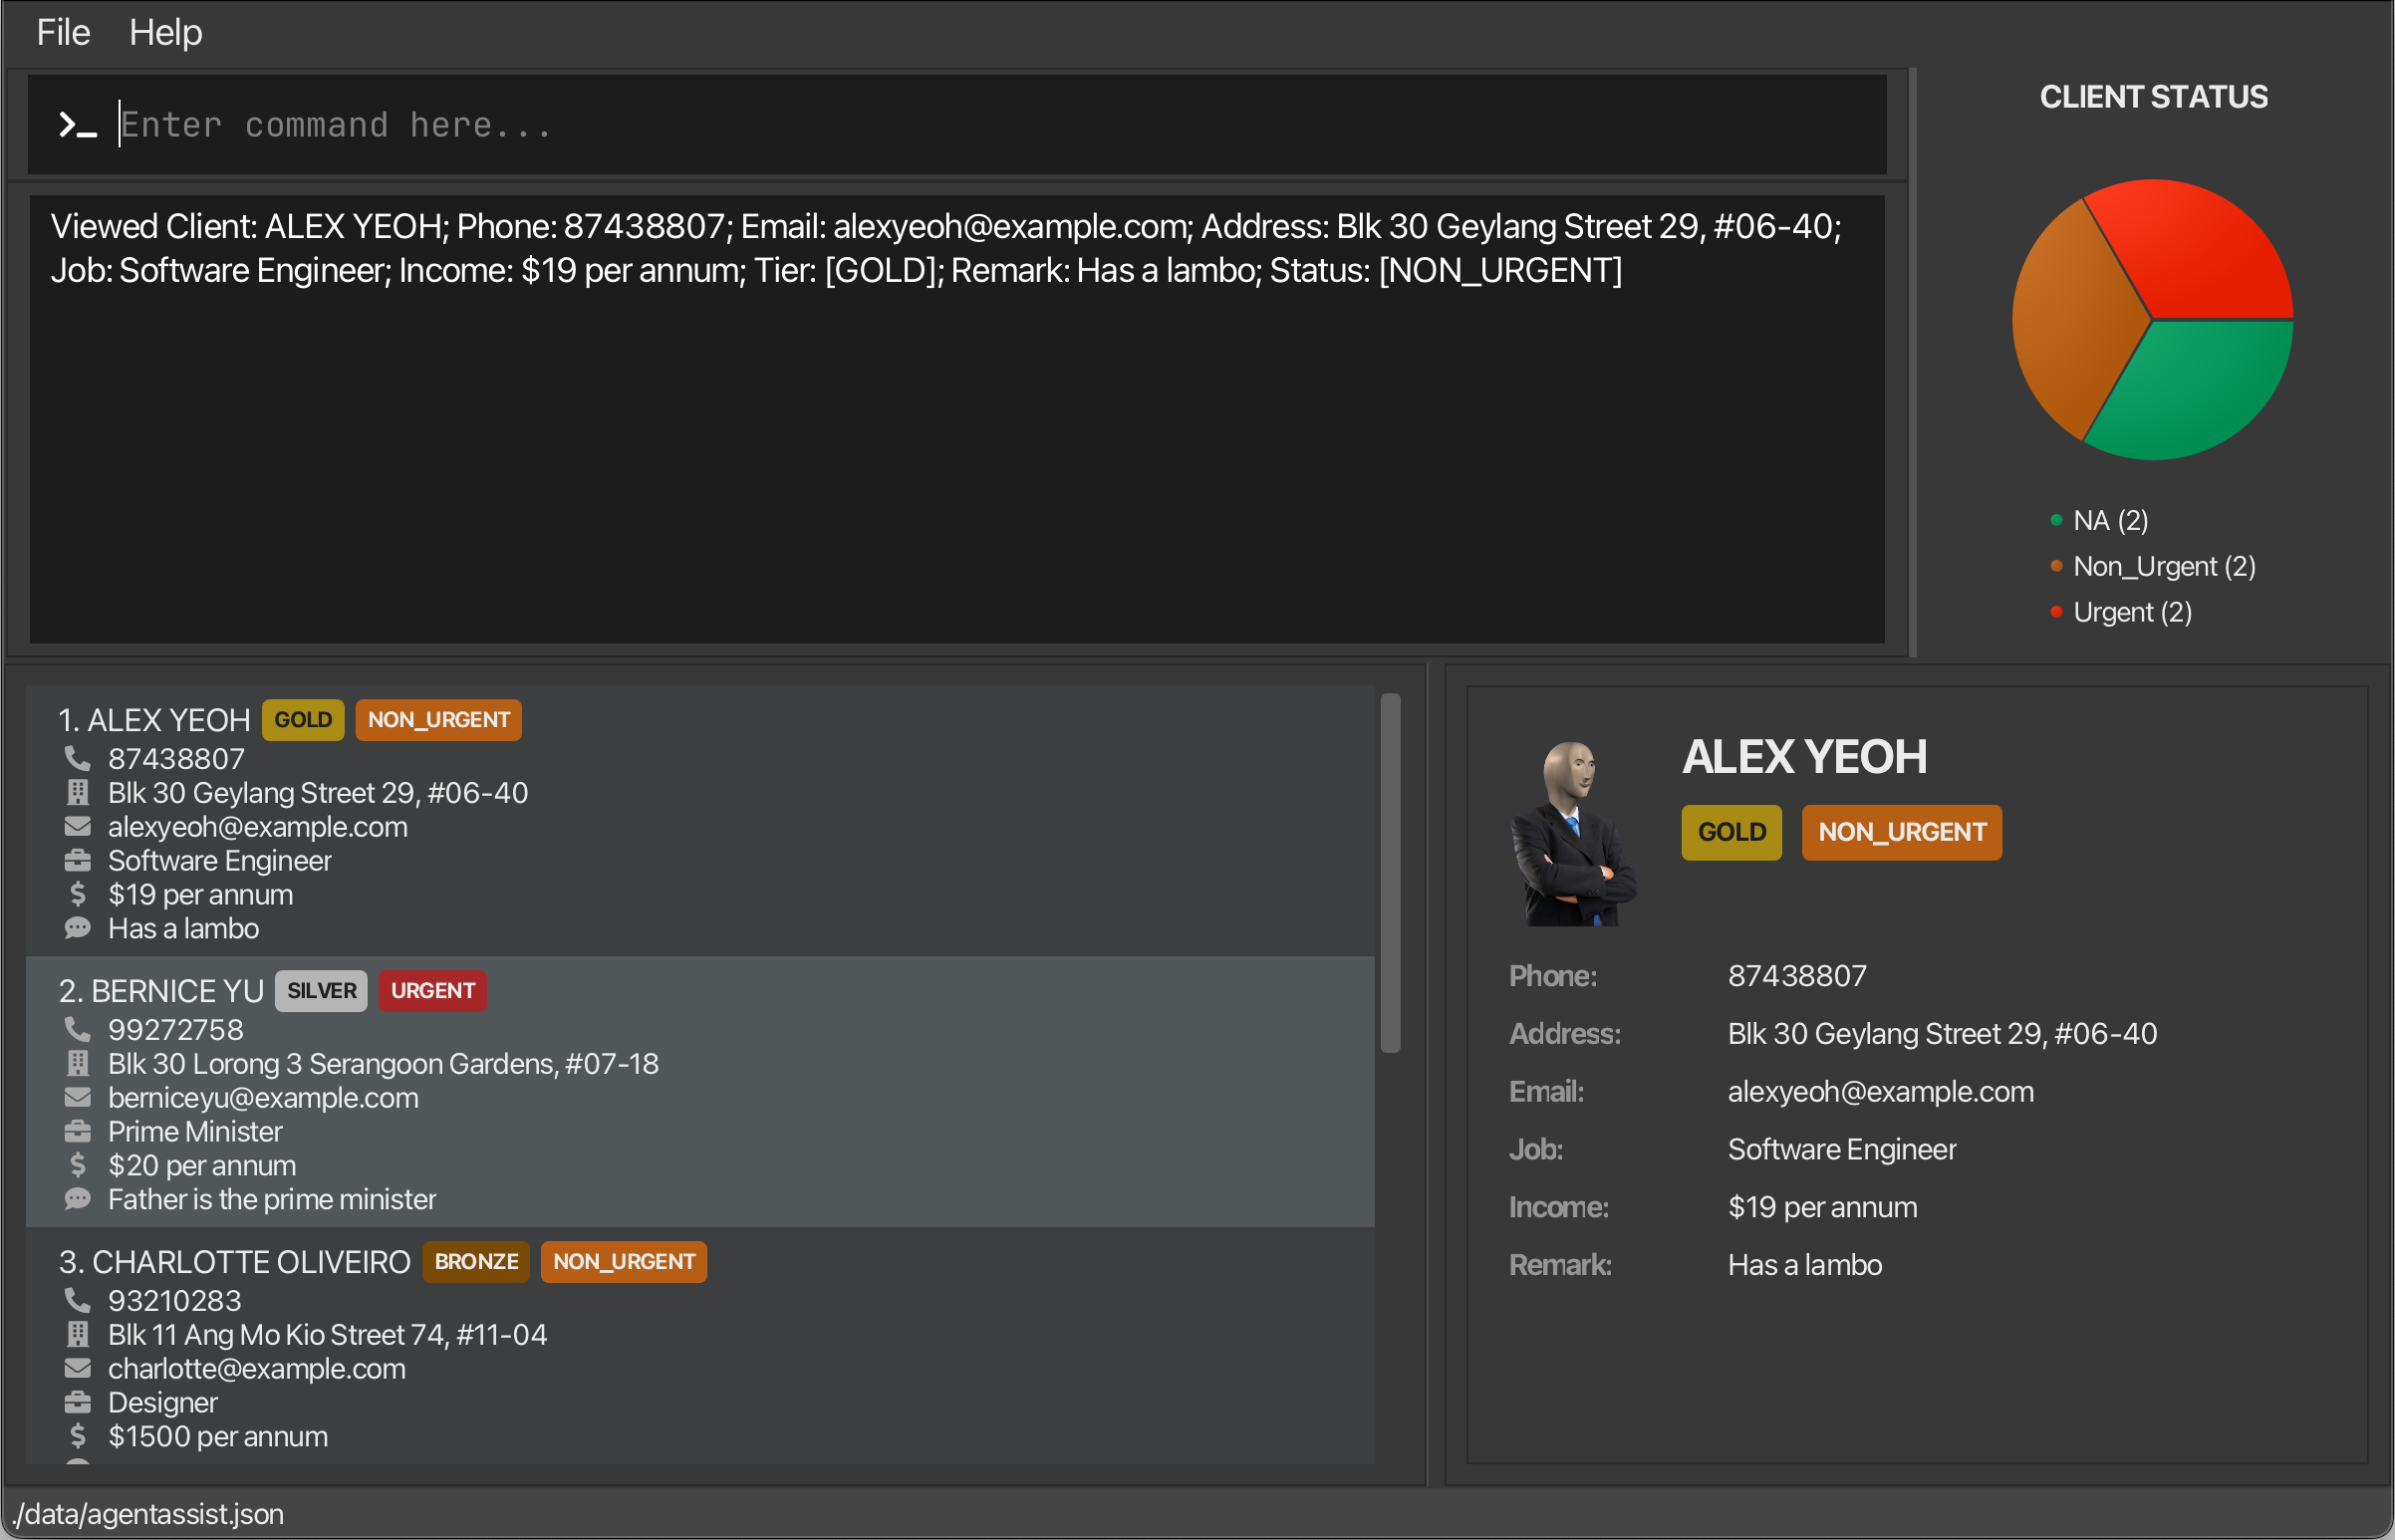
After View
- On Error:
- Error caused by invalid index
- Message:
Invalid command format!
view: Views the client identified by the index number used in the displayed client list.
Parameters: INDEX (must be a positive integer)
Example: 'view 1'
- Message:
- Error caused by invalid index
💡 Pro Tip: You can use the split view to compare client details side by side with the main list, making it easier to reference multiple clients at once.
6.4.2 Closing a Client’s Details
Purpose: Close the split view of client details and return to the full list view.
Command Format:
close
- No parameters required
- This command has no effect if the split view is not currently open
What to Expect:
- On Success:
- The split view closes.
- The main list view returns to full width.
- The images below show the GUI before and after using
close:
Before Close 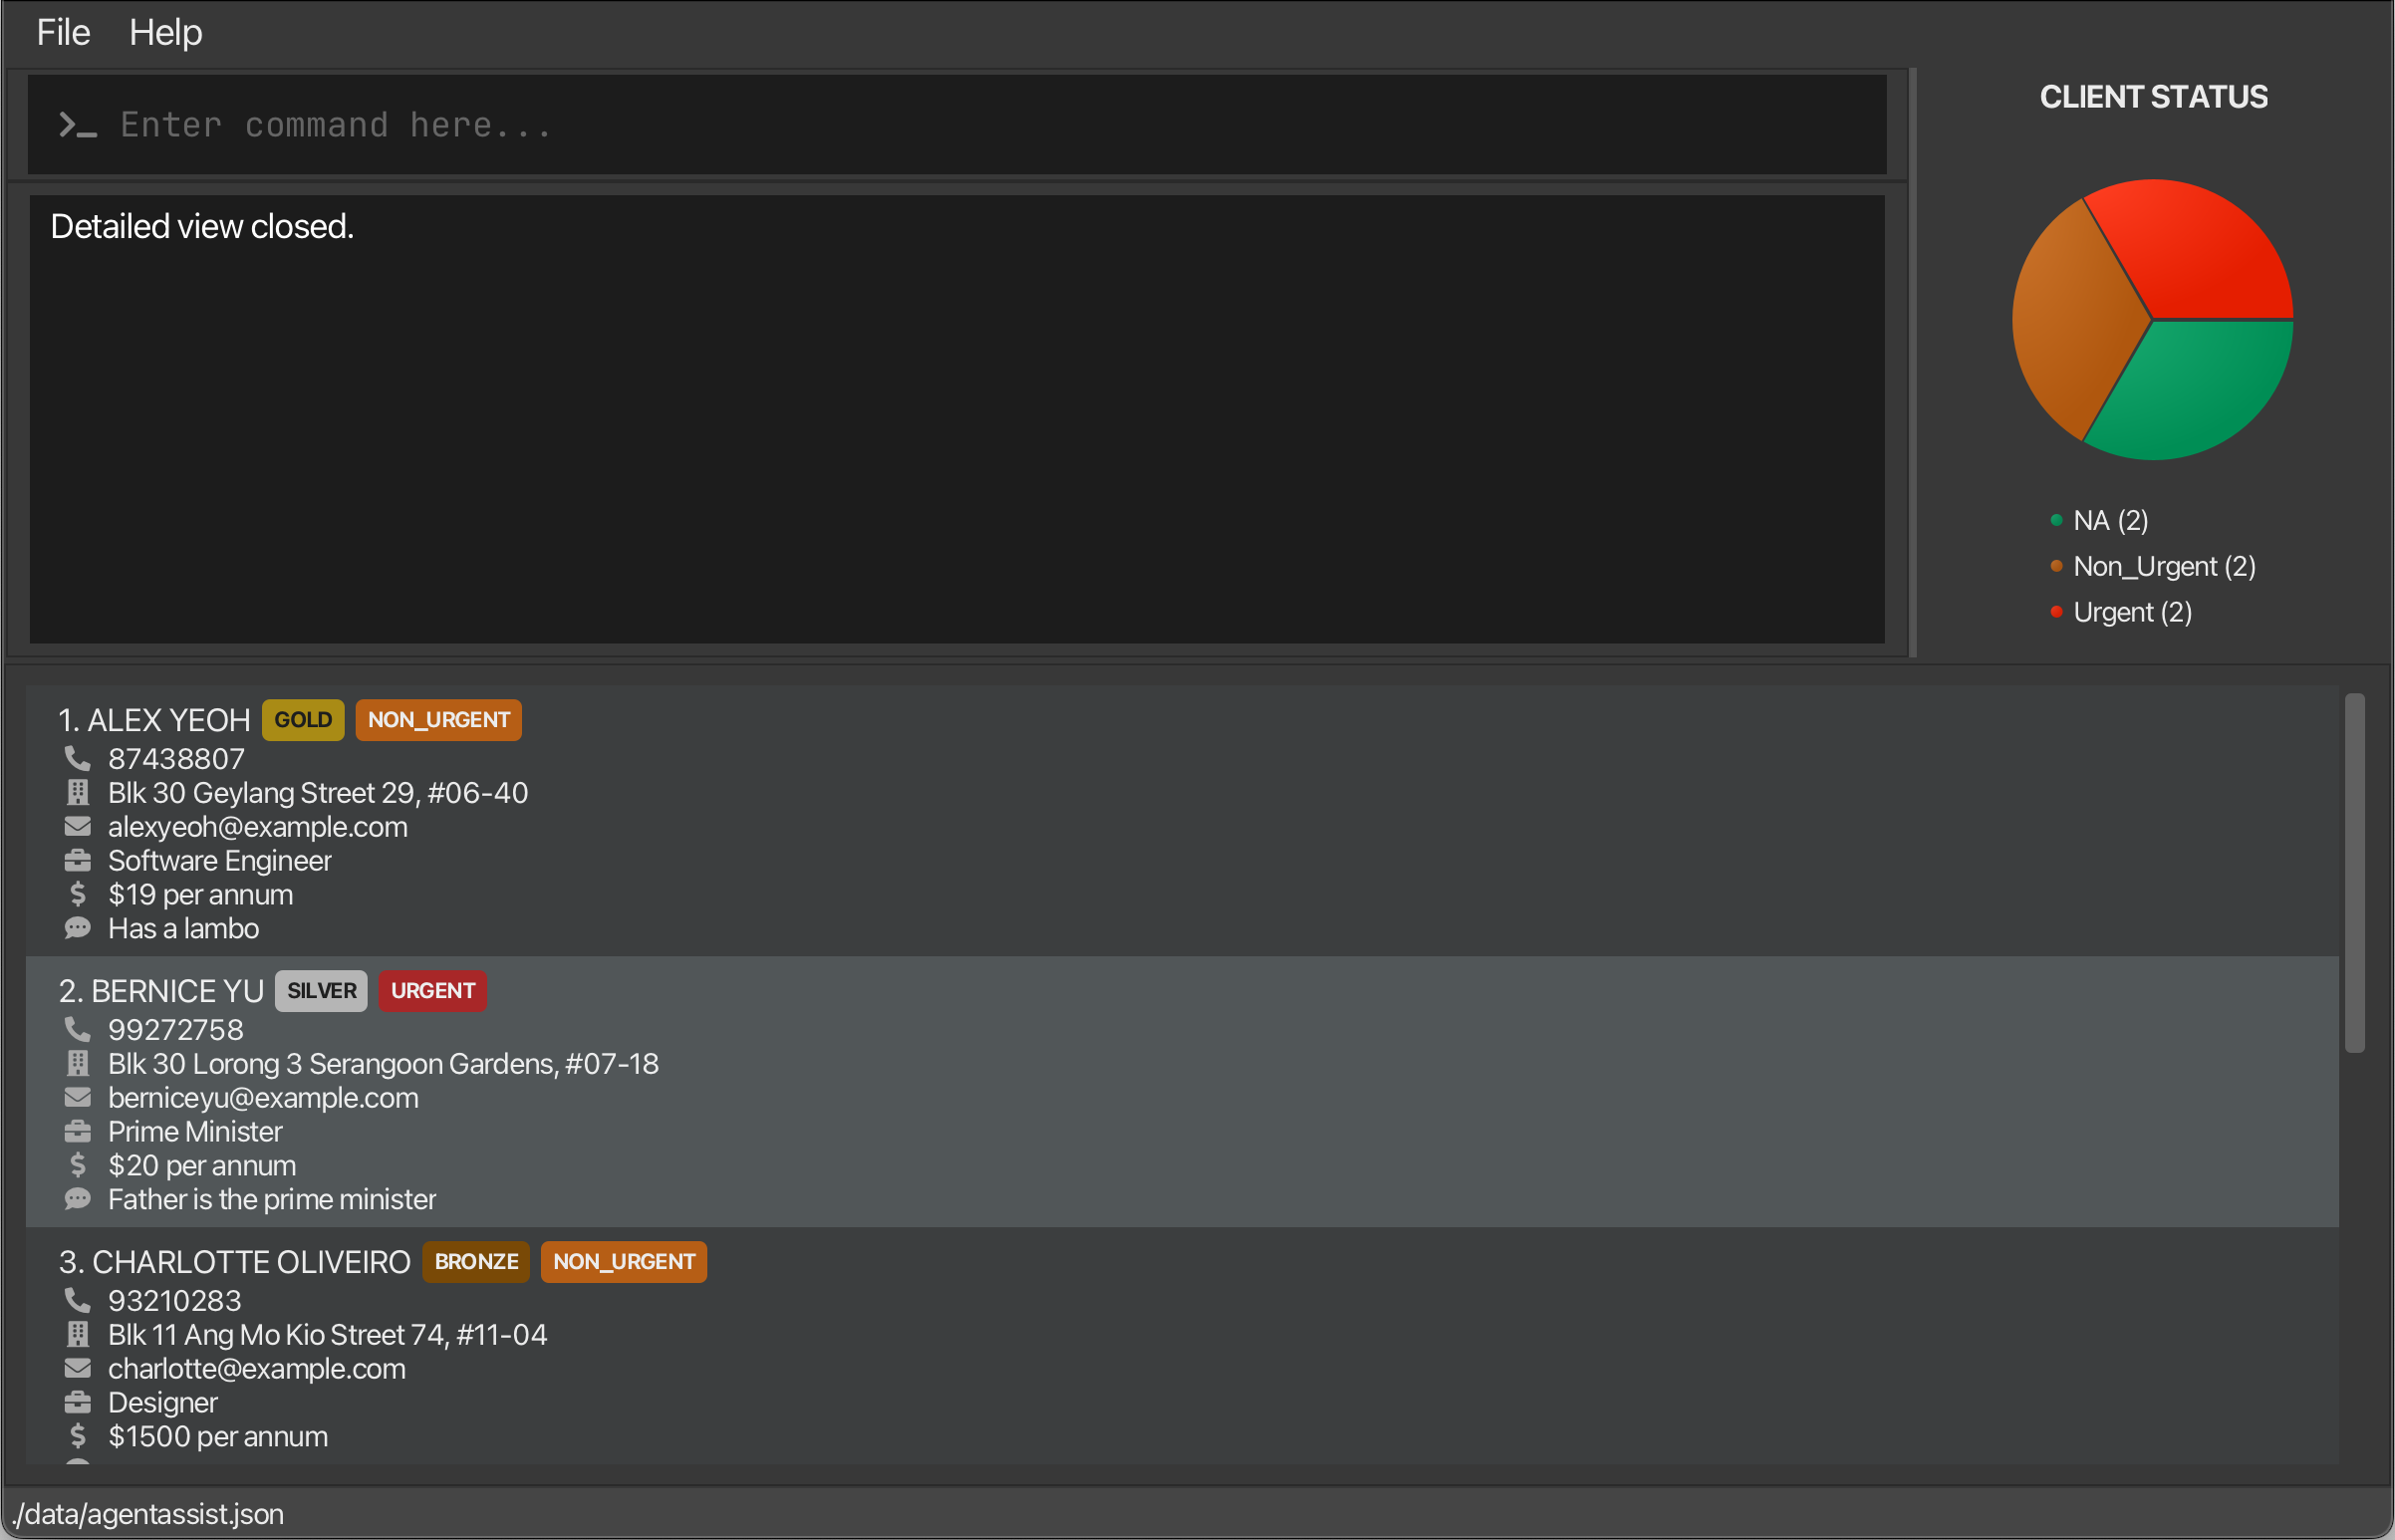
After Close
- On Error:
- No error messages are shown; the command is simply ignored if no split view is open.
6.4.3 Undo Previous Command
Purpose: Undo previous command.
Command Format:
undo
- Reverts all changes of the previous command.
- Note: The
undocommand can only be used onthe most recent command that made a permanent change to the client list. If no such changes have been made, theundocommand will not function. Commands eligible forundoinclude:addeditdeleteclear
- Note: You can only use
undoonce. Usingundotwice in a row has the same effect as not using theundocommand at all.
6.4.4 Help Menu
Purpose: Provides quick access to a command summary and the user guide for AgentAssist.
Command Format:
help
- Opens up a dialog box that provides:
- Command summary table with command format and basic examples
- Link to the User Guide
Note: An image of the help dialog box can be seen on the next page.
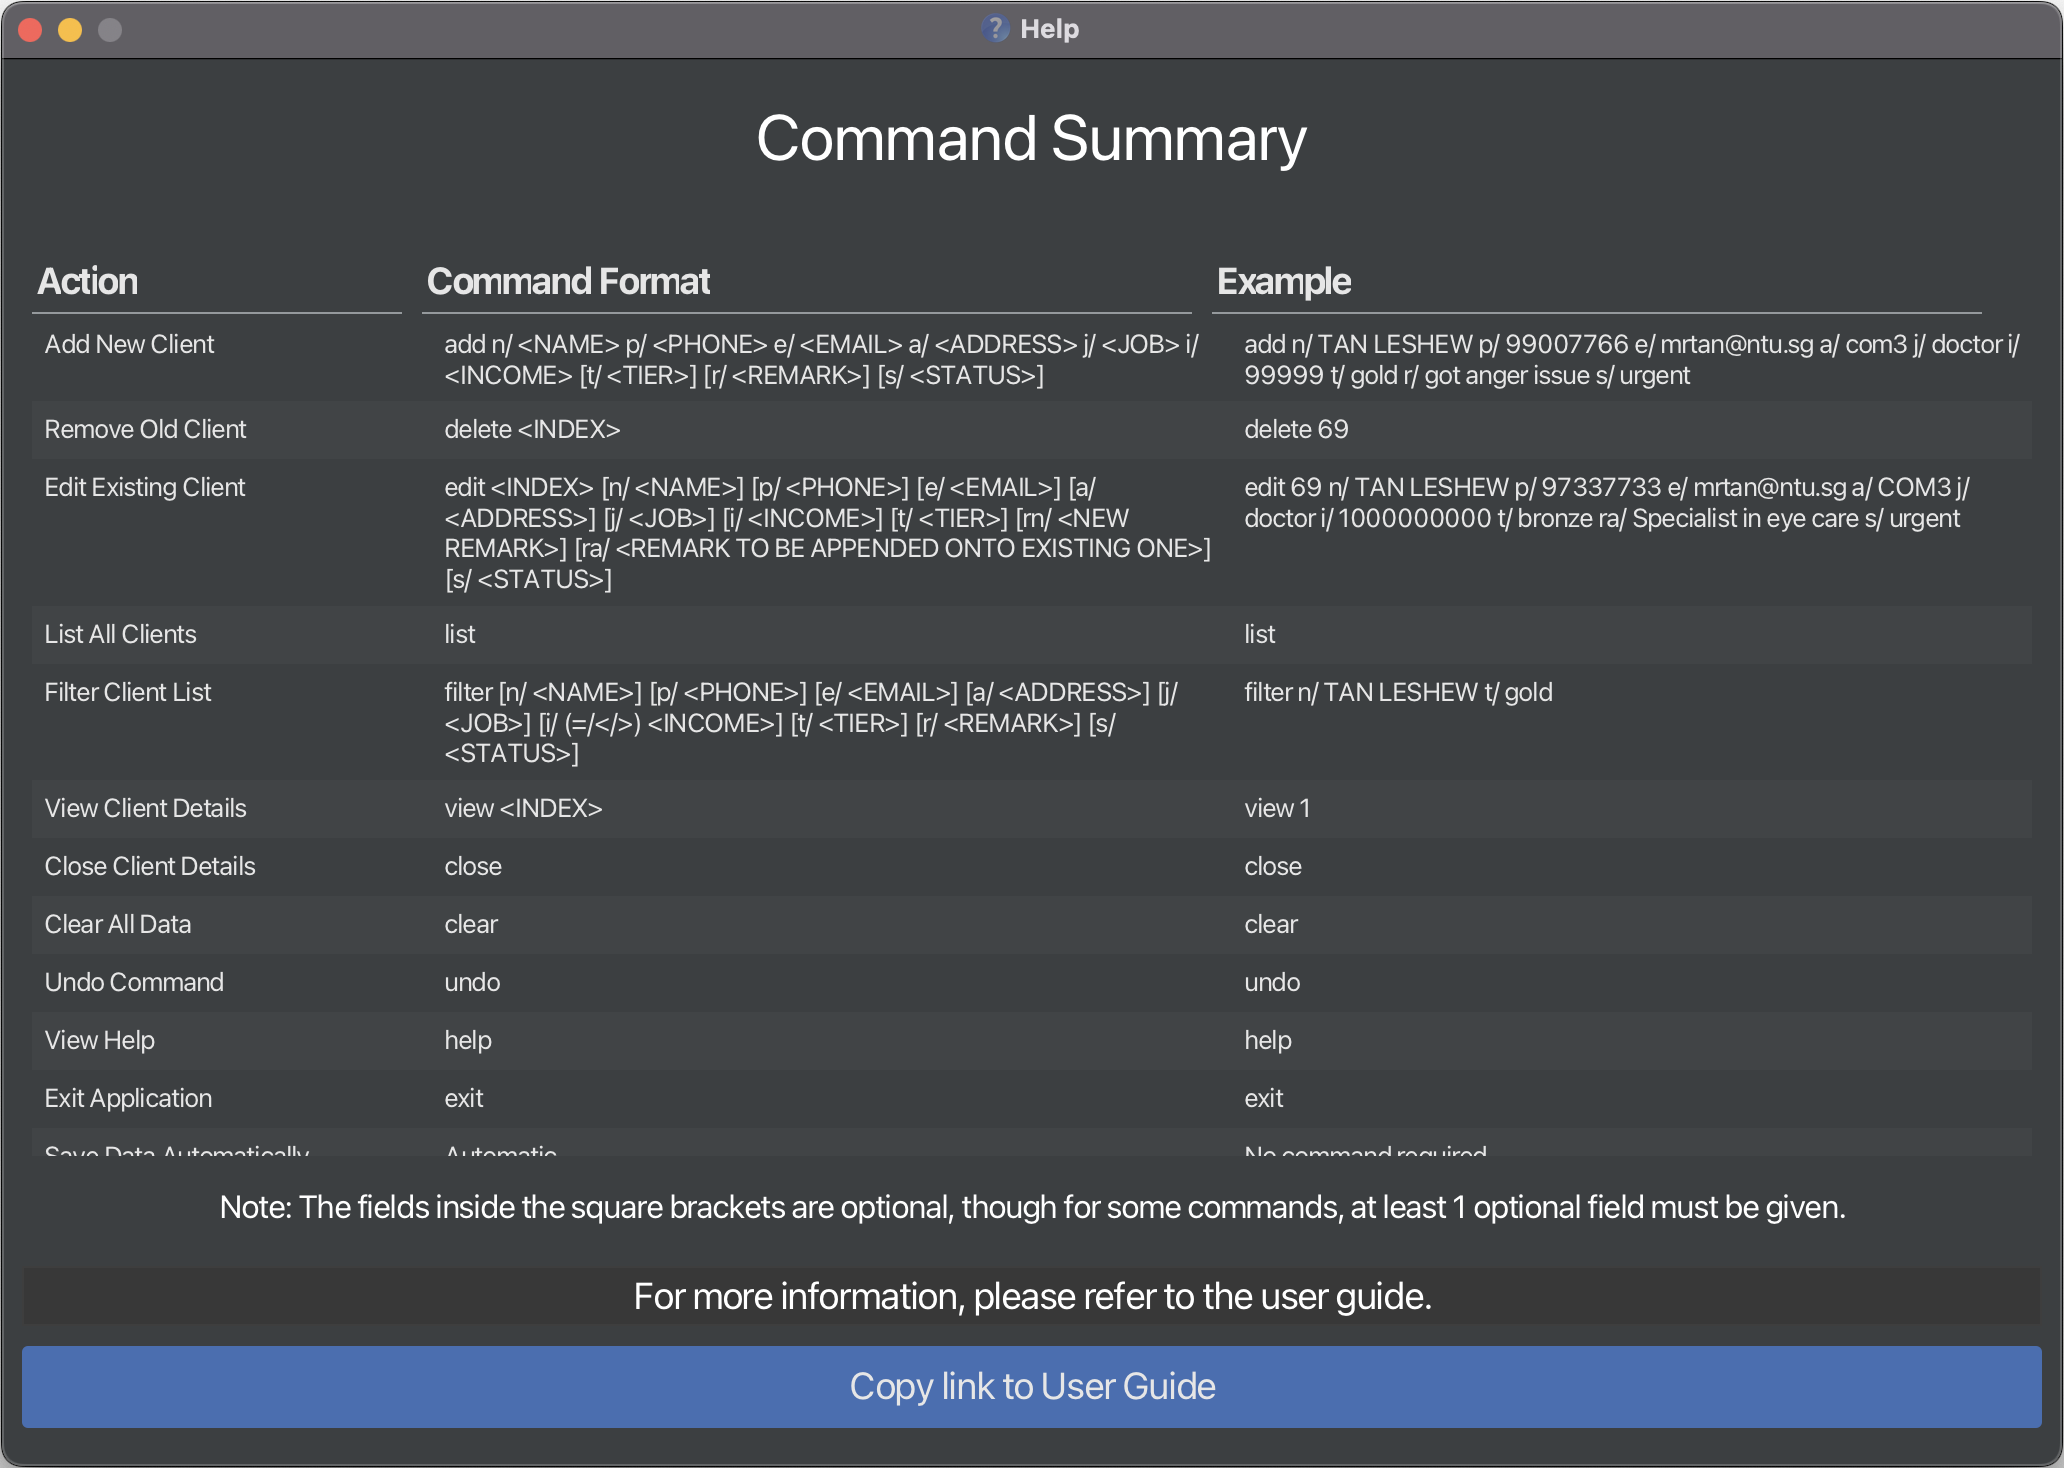
6.4.5 Exiting AgentAssist
Purpose: Exit the application directly from the command line, providing a quick and easy way to close the program without using external controls.
Command Format:
exit
- After executing the command, the program will close, effectively exiting the application.
6.5 Saving Data
AgentAssist automatically saves all client data to your computer after each command. There’s no need to manually save anything.
6.6 Modifying the Data File
The data in AgentAssist is automatically saved as a JSON file at [JAR file location]/data/agentassist.json. Advanced users are welcome to update data directly by editing that data file.
⚠️ Danger: If the data file format becomes invalid, AgentAssist will discard all data and start with an empty file on the next run. It’s strongly recommended to back up the file before any manual edits.
Incorrect data modifications may also cause unexpected behavior. Do take note that no warnings will be given.
Only modify the data file if you’re confident in doing so correctly.
6.7 Modifying the Preferences File
The window size settings for AgentAssist is automatically saved as a JSON file at [JAR file location]/preferences.json. Advanced users are welcome to update the window size directly by editing that preferences file.
- Note: The minimum window size for AgentAssist is fixed at 800x600.
⚠️ Danger: If the window size is set too large, the application will render incorrectly.
Incorrect preference modifications may also cause unexpected behavior. Do take note that no warnings will be given.
Only modify the preferences file if you’re confident in doing so correctly.
7. FAQ
How do I transfer my data to another Computer?
Install the app in the other computer and overwrite the empty data file it creates with the file that contains the data of your previous AgentAssist home folder.
How do I change the remarks, credit card tier, or status of an existing client?
Use the edit command, and specify the t/ flag for the credit card tier, and rn/ or ra/ for remark(s). If you wish to remove the visible Tier or Status label of a client, use t/ NA or s/ NA with the edit command. To remove all remarks of a client, use rn/ NA with the edit command.
Note: If you append to a remark with the value NA (an empty remark), it will be replaced with the new remark, without any blank lines appearing.
Why am I getting an error when trying to edit the remark of an existing client?
Ensure that the command syntax is correct, and note that the rn/ and ra/ flags cannot be used together. The rn/ flag replaces the existing remark(s), while ra/ appends to the current remark(s).
What do the different tier/status colors represent in the UI?
Each credit card tier and client status is visually distinguished in the UI with colored labels. You may view the section about Tier and Status color codes.
8. Known issues
- When using multiple screens, if you move the application to a secondary screen, and later switch to using only the primary screen, the GUI will open off-screen. The remedy is to delete the
preferences.jsonfile created by the application before running the application again. - If you minimize the Help Window and then run the
helpcommand (or use theHelpmenu, or the keyboard shortcutF1) again, the original Help Window will remain minimized, and no new Help Window will appear. The remedy is to manually restore the minimized Help Window. - Names Containing
/: Using/in names can result in an invalid command error or may inadvertently assign incorrect attributes to the client. To avoid this, spell out names fully. For example, instead of “Ramesh s/o Ravichandran,” use “Ramesh Son Of Ravichandran”. - Names Containing
@: The system does not currently support names with the@symbol, but it is planned for a future enhancement. To avoid errors in the meantime, please replace@with an alternative format, such as “John at Doe” instead of “John @ Doe.” - Using non-English text input can cause bugs. This release fully supports only standard English text input and does not support the extended Latin alphabet or non-English characters. Using accented characters (e.g., é, ñ), non-Latin scripts (e.g., Chinese), or right-to-left text (e.g., Arabic) may lead to unexpected behavior, including display issues, data processing errors, or even command parsing failures. Expanded support for international characters and languages is planned for future releases.
- For index based commands, negative inputs and inputs that are too large result in inconsistent error messages. We are actively working on resolving this inconsistency in future releases.
- For the edit command, edits that do not result in changes to client details are currently considered valid. We are working on adding warnings to notify users of unchanged edits in future releases.
- For the Status Pie Chart, if the application window size is too small, the legend will disappear. We are aware of this, and this is a limitation of JavaFX.
9. Command Summary
| Action | Command Format | Example |
|---|---|---|
| Add New Client | add n/ <NAME> p/ <PHONE> e/ <EMAIL> a/ <ADDRESS> j/ <JOB> i/ <INCOME> [t/ <TIER>] [r/ <REMARK>] [s/ <STATUS>] |
add n/ GORDON MOORE p/ 99007766 e/ gmoore@ntu.sg a/ COM3 j/ engineer i/ 99999 t/ gold r/ remark s/ urgent |
| Delete Existing Client | delete <INDEX> |
delete 69 |
| Edit Existing Client | edit <INDEX> [n/ <NAME>] [p/ <PHONE>] [e/ <EMAIL>] [a/ <ADDRESS>] [j/ <JOB>] [i/ <INCOME>] [t/ <TIER>] [rn/ <NEW REMARK>] [ra/ <REMARK TO BE APPENDED>] [s/ <STATUS>] |
edit 69 n/ GORDON MOORE p/ 77337733 e/ gmoore_new@ntu.sg a/ COM3 j/ doctor i/ 1000000000 ra/ added info s/ urgent |
| List All Clients | list |
list |
| Filter Client List | filter [n/ <NAME>] [p/ <PHONE>] [e/ <EMAIL>] [a/ <ADDRESS>] [j/ <JOB>] [r/ <REMARK>] [t/ <TIER>] [i/ (=/</>) <INCOME>] [s/ <STATUS>] |
filter n/ GORDON MOORE j/ doctor t/ gold s/ urgent |
| View Client Details | view <INDEX> |
view 1 |
| Close Client Details | close |
close |
| Clear All Data | clear |
clear |
| Undo Command | undo |
undo |
| View Help | help |
help |
| Exit Application | exit |
exit |